
Skype for Business Meeting room devices are gaining popularity in recent months as companies seek to extend the UC capabilities from the PC desktop to meeting spaces such as huddle rooms, small and medium sized meeting rooms and even large conference rooms. Polycom has been providing native Skype for Business meeting room solutions for many years now, such as the popular Polycom Group Series family of video collaboration endpoints, and more recently the Polycom Trio8800 SmartHub which is the successor to the widely used starfish conference phones but with additional video and content sharing capabilities. In addition, Microsoft's partners are soon to launch the Skype Room Systems V2 solution which adds yet another meeting room device that customers can choose from.
This blog post serves as a guide on how to provision these devices in an Office365 Hybrid environment where an on-premise AD is synced with Azure AD along with ADFS deployed, Exchange is purely online and Skype for Business configured with hybrid setup with some users homed on-premise and some online.
This blog post serves as a guide on how to provision these devices in an Office365 Hybrid environment where an on-premise AD is synced with Azure AD along with ADFS deployed, Exchange is purely online and Skype for Business configured with hybrid setup with some users homed on-premise and some online.
The main approach to provisioning these meeting room devices is with an Exchange Room mailbox account along with an on-premise or online Skype for Business account. At the same time, we want to maintain the consistency of using an on-premise AD to sync with Azure AD using AADConnect. With these objectives, this walkthrough covers the following provide steps to provision a Polycom Trio8800 device:
1. Create an on-premise AD account for the meeting room device and set 'proxyaddress' attribute for SMTP
2. Sync account to Azure AD and assign an E3 license to the account so that the Exchange online mailbox is created
3. Convert the Exchange online mailbox type to 'Room' and set the calendar processing attributes
4. Enable account for Skype for Business on-premise or Online
1. Create an on-premise AD account for the meeting room device and set 'proxyaddress' attribute for SMTP
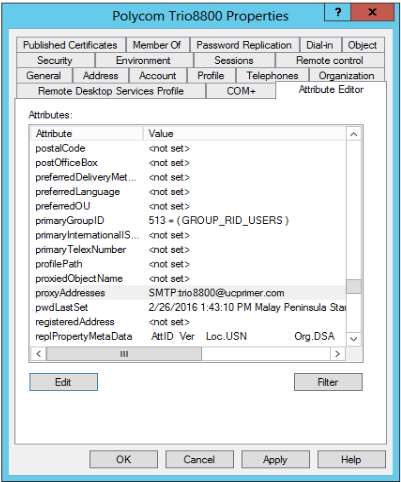
To begin we simply create a normal user account for the Trio8800 using either powershell or the AD MMC. The user principal name used is Trio8800@ucprimer.com where ucprimer.com is the shared split domain suffix for our hybrid environment. Note that we can also create the account in Azure AD directly, aka a cloud identity but the domain suffix will have a 'onmicrosoft.com' which results in inconsistent naming convention. Once created, we need to modify the proxyaddress attribute to add the "SMTP:trio8800@ucprimer.com" entry so that a consistent email address will be generated in the Exchange online account. Below is the screen shot of this attribute:
1. Create an on-premise AD account for the meeting room device and set 'proxyaddress' attribute for SMTP
2. Sync account to Azure AD and assign an E3 license to the account so that the Exchange online mailbox is created
3. Convert the Exchange online mailbox type to 'Room' and set the calendar processing attributes
4. Enable account for Skype for Business on-premise or Online
1. Create an on-premise AD account for the meeting room device and set 'proxyaddress' attribute for SMTP
To begin we simply create a normal user account for the Trio8800 using either powershell or the AD MMC. The user principal name used is Trio8800@ucprimer.com where ucprimer.com is the shared split domain suffix for our hybrid environment. Note that we can also create the account in Azure AD directly, aka a cloud identity but the domain suffix will have a 'onmicrosoft.com' which results in inconsistent naming convention. Once created, we need to modify the proxyaddress attribute to add the "SMTP:trio8800@ucprimer.com" entry so that a consistent email address will be generated in the Exchange online account. Below is the screen shot of this attribute:
2. Sync account to Azure AD and assign an E3 license to the account so that the Exchange online mailbox is created
To initiate a sync we can import the ADSync module in powershell on our AADConnect server and run the cmdlet Start-ADSyncSyncCycle as shown below:
To initiate a sync we can import the ADSync module in powershell on our AADConnect server and run the cmdlet Start-ADSyncSyncCycle as shown below:

| Now the account will appear in the list of users in Office365 Azure AD and we can proceed to assign a license as shown on the right: Note that creating resource mailboxes actually do not require an Exchange online license. However, we still need a Skype for Business online license for these room system accounts. Here we are just assigning a normal user license so that the mailbox gets created automatically. After we convert the mailbox to a resource type, we can remove the Exchange online license and it will still work. However, we need to keep the Skype for Business license since the room system needs to sign-in into a Skype for Business account. | 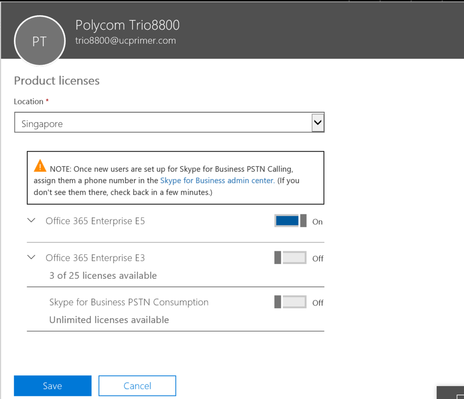 |
3. Convert the Exchange online mailbox type to 'Room' and set the calendar processing attributes
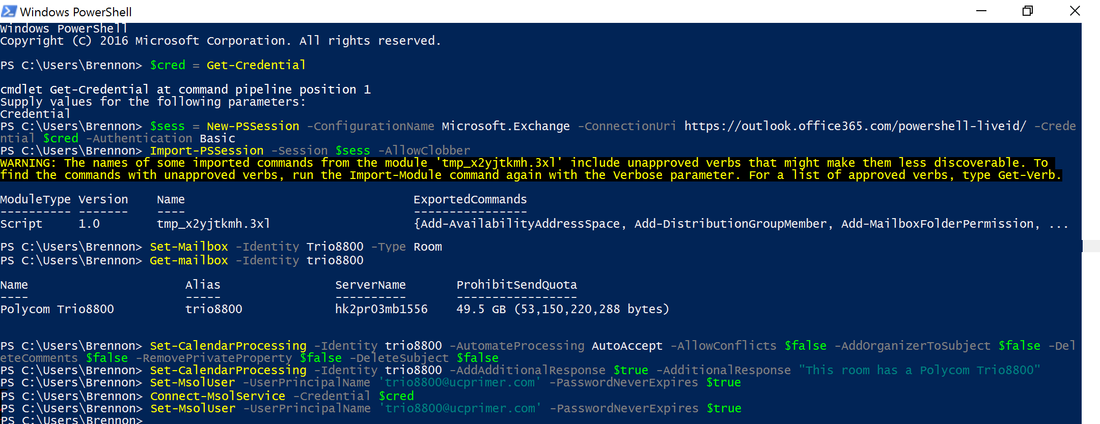
Creating the mailbox may take several minutes. Once that is completed, we need to convert the mailbox from a Regular type to Room and also set the necessary calendar processing attributes. To do this we use remote powershell to access the Exchange online tenant and run the cmdlets as shown below:
$cred = Get-Credential
New-PSSession -ConfigurationName Microsoft.Exchange -ConnectionUri https://outlook.office365.com/powershell-liveid/ -Credential $cred -Authentication Basic
Import-PSSession -Session $sess -AllowClobber
Set-Mailbox -identity Trio8800 -Type Room
Set-CalendarProcessing -Identity Trio8800 -AutomateProcessing AutoAccept -AddOrganizerToSubject $false -AllowConflicts $false -DeleteComments $false -DeleteSubject $false -RemovePrivateProperty $false
Set-CalendarProcessing -Identity Trio8800 -AddAdditionalResponse $true -AdditionalResponse "This room has a Polycom Trio8800"
Connect-MsolService -Credential $cred
Set-MsolUser -userPrincipalName trio8800@ucprimer.com -PasswordNeverExpires $true
3.1 Alternative approach to creating room mailbox directly on Exchange online using remote powershell.
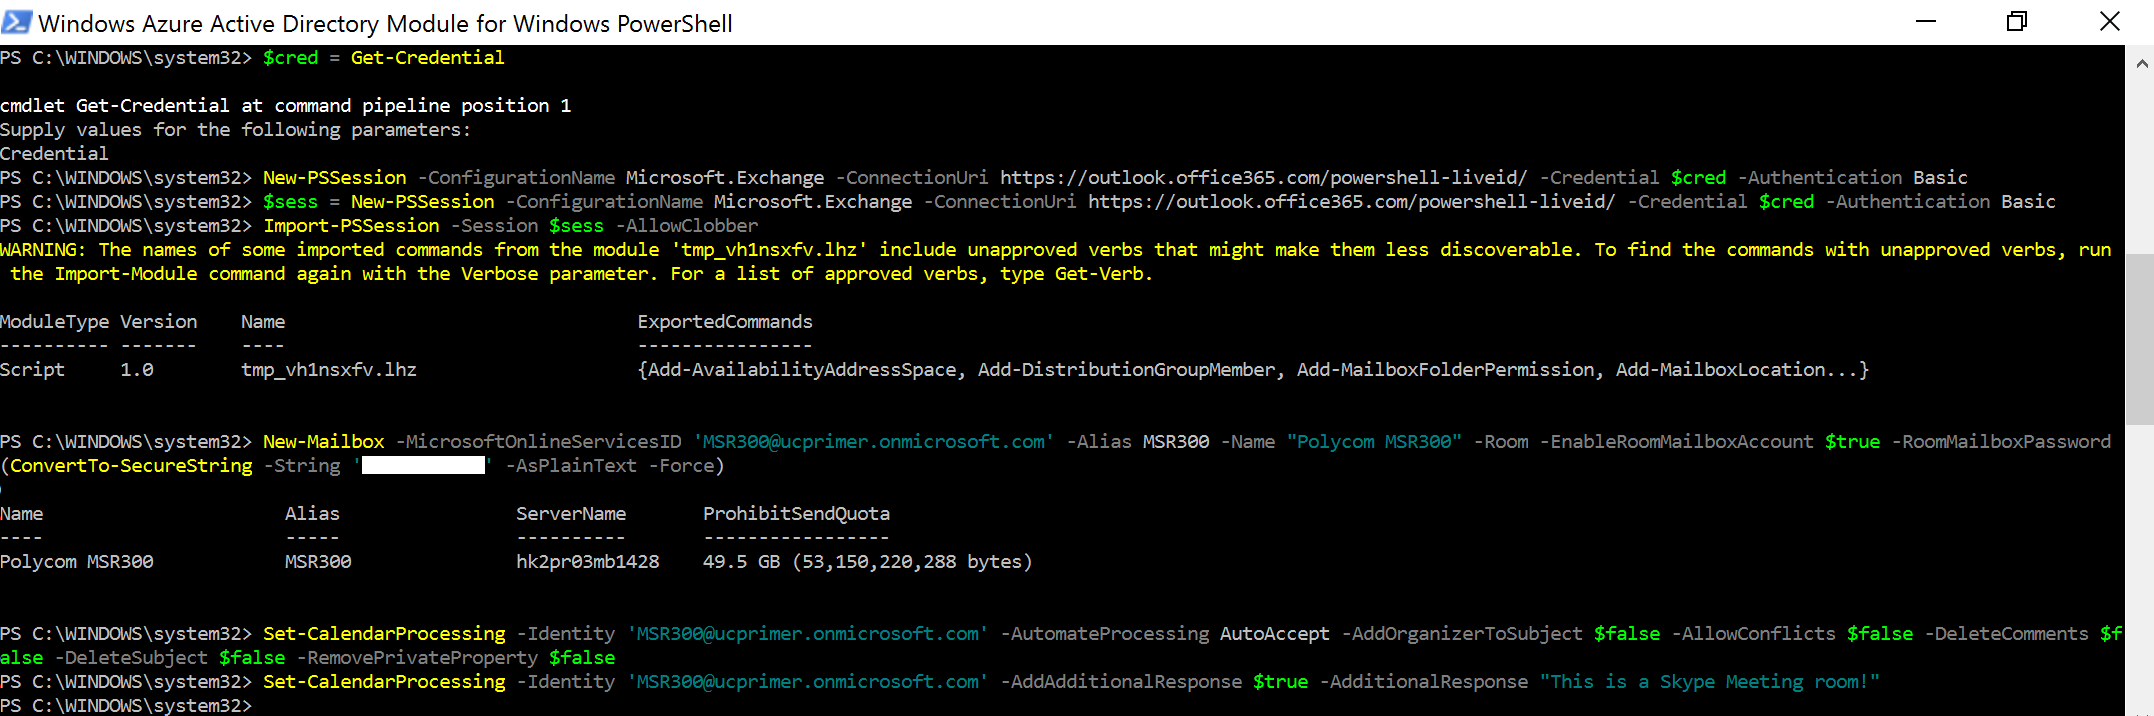
Its worthwhile to note that steps 1-3 can be done by creating the room mailbox directly on Exchange online using remote powershell. This will result in a room account with a cloud-based identity that ends with a 'onmicrosoft.com' suffix but that should not matter for most cases. We will still need to enable the account later so that a Skype for Business online account can be attached. Below are the powershell cmdlets for reference:
New-Mailbox -MicrosoftOnlineServicesID 'MSR300@ucprimer.onmicrosoft.com' -Alias MSR300 -Name "Polycom MSR300" -Room -EnableRoomMailboxAccount $true -RoomMailboxPassword (ConvertTo-SecureString -String 'PASSWORD' -AsPlainText -Force)
Set-CalendarProcessing -Identity 'MSR300@ucprimer.onmicrosoft.com' -AutomateProcessing AutoAccept -AddOrganizerToSubject $false -AllowConflicts $false -DeleteComments $false -DeleteSubject $false -RemovePrivateProperty $false
Set-CalendarProcessing -Identity 'MSR300@ucprimer.onmicrosoft.com' -AddAdditionalResponse $true -AdditionalResponse "This is a Skype Meeting room!"
4. Enable account for Skype for Business on-premise or Online
Now that we've created the mailbox, we can proceed to create a Skype for Business account for the room system. This is done using the powershell cmdlet Enable-CsMeetingRoom. For an on-premise account, we simply run the Skype for Business powershell cmdlet on one of the Front End Servers. For eg:
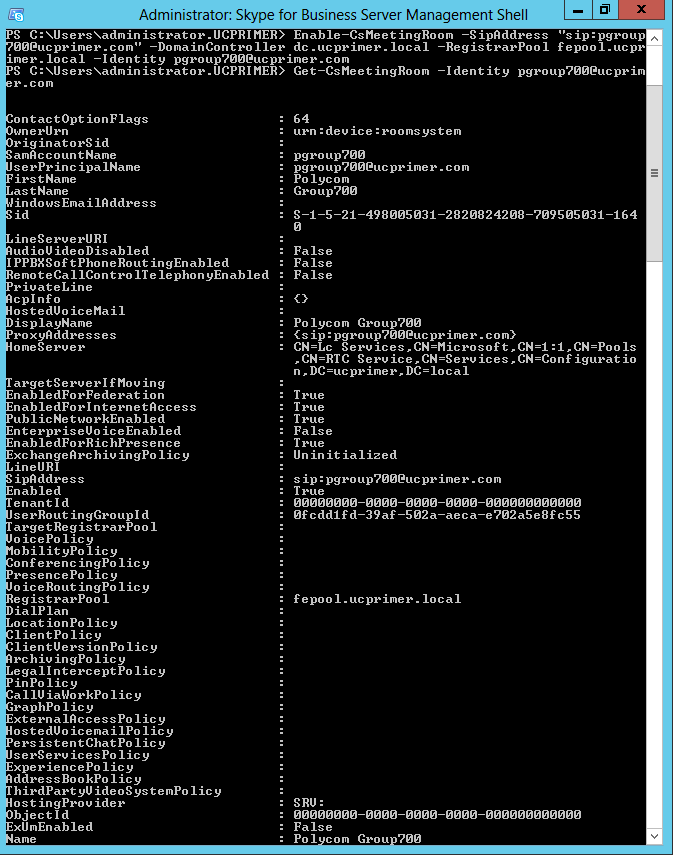
Enable-CsMeetingRoom -SipAddress "sip:pgroup700@sipdomain.com" -domaincontroller dc.domain.local -RegistrarPool fepool.domain.local -Identity Trio8800
Now that we've created the mailbox, we can proceed to create a Skype for Business account for the room system. This is done using the powershell cmdlet Enable-CsMeetingRoom. For an on-premise account, we simply run the Skype for Business powershell cmdlet on one of the Front End Servers. For eg:
Enable-CsMeetingRoom -SipAddress "sip:pgroup700@sipdomain.com" -domaincontroller dc.domain.local -RegistrarPool fepool.domain.local -Identity Trio8800
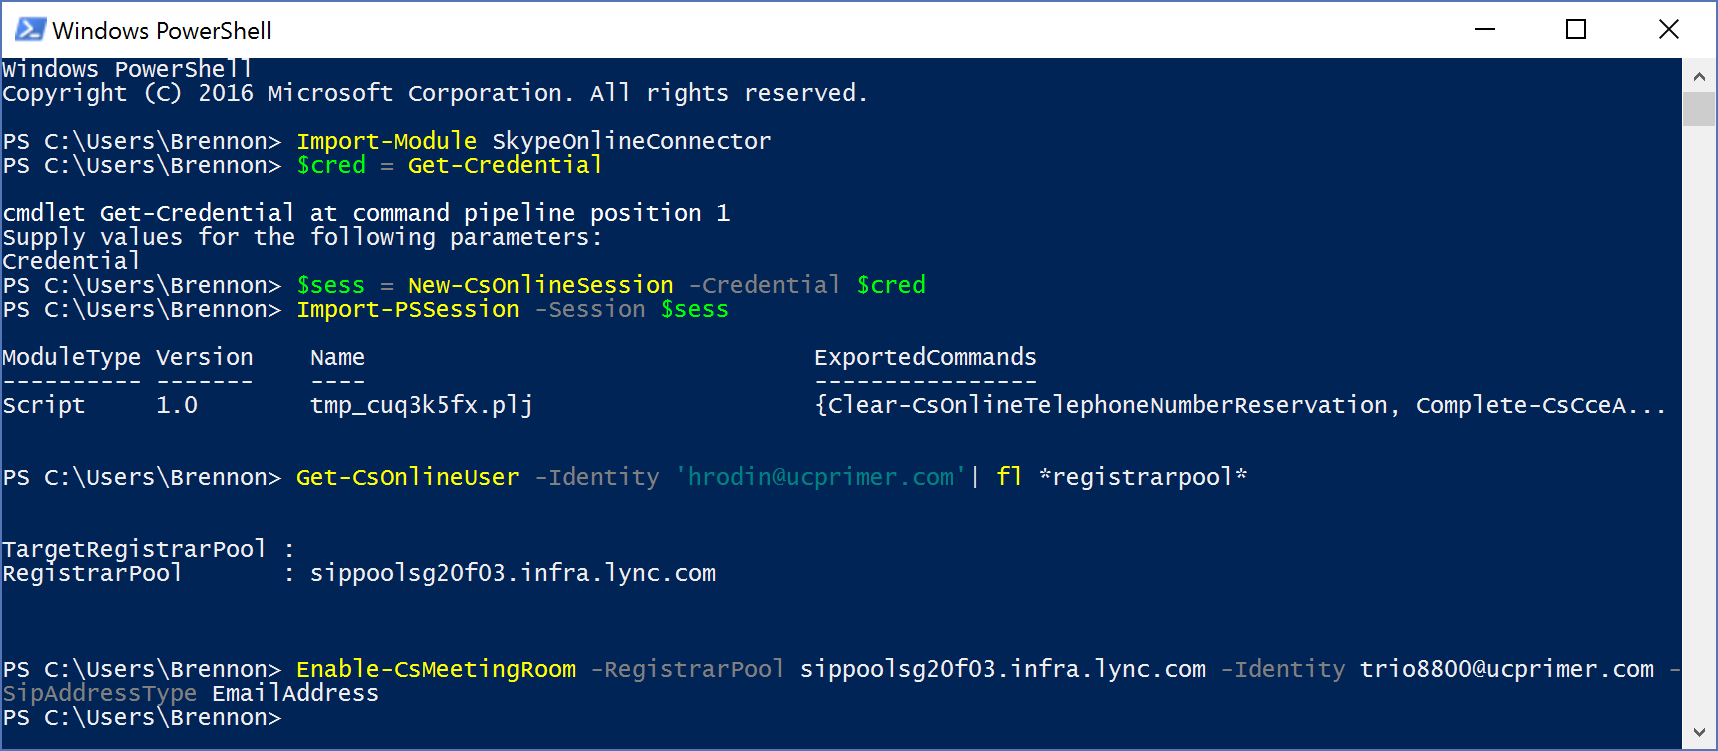
To enable the room system on Skype for Business Online, we run remote powershell into the SfB tenant and first get the registrar FQDN using a Get-CsOnlineUser cmdlet and then we run Enable-CsMeetingRoom just like the for the on-premise account:
Get-CsOnlineUser -Identity 'user@domain.com'| fl *registrarpool*
Enable-CsMeetingRoom -Identity trio8800@ucprimer.com -RegistrarPool 'sippoolsg20f03.infra.lync.com -SipAddressType EmailAddress
Example is shown below:
Get-CsOnlineUser -Identity 'user@domain.com'| fl *registrarpool*
Enable-CsMeetingRoom -Identity trio8800@ucprimer.com -RegistrarPool 'sippoolsg20f03.infra.lync.com -SipAddressType EmailAddress
Example is shown below:
Conclusion
This blog posts walks through the steps required to provision Exchange Online and Skype for Business accounts for meeting room devices for either Skype for Business On-premise or Online. The steps are applicable for meeting room solutions such as the Polycom Group Series, Polycom Trio Collaboration SmartHub and the upcoming Polycom MSR Skype Room Systems.
This blog posts walks through the steps required to provision Exchange Online and Skype for Business accounts for meeting room devices for either Skype for Business On-premise or Online. The steps are applicable for meeting room solutions such as the Polycom Group Series, Polycom Trio Collaboration SmartHub and the upcoming Polycom MSR Skype Room Systems.


 RSS Feed