

After several days of configuring and troubleshooting, finally got Lync integration with Cisco CUCM 8.6 working in a lab environment. This article walks through the steps taken and some of the problems encountered. Microsoft has a
document that provides step-by-step guidance on the integration available for download here which this article is based on. The steps in the document will not be repeated in this article, rather only the specific implementation in the lab and any deviations will be highlighted. The exact version of CUCM used in the lab is 8.6.2.22900-9 which is slightly newer than the 8.5.1.11900-211 version that the document is based on. Nonetheless all the steps in the document are still valid and can be used with some minor changes which are described in this article. Below shows the diagram for the lab setup:
document that provides step-by-step guidance on the integration available for download here which this article is based on. The steps in the document will not be repeated in this article, rather only the specific implementation in the lab and any deviations will be highlighted. The exact version of CUCM used in the lab is 8.6.2.22900-9 which is slightly newer than the 8.5.1.11900-211 version that the document is based on. Nonetheless all the steps in the document are still valid and can be used with some minor changes which are described in this article. Below shows the diagram for the lab setup:
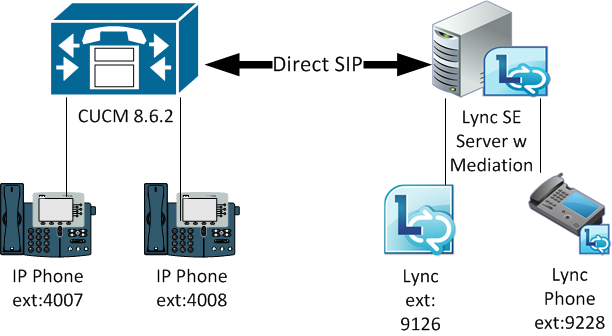
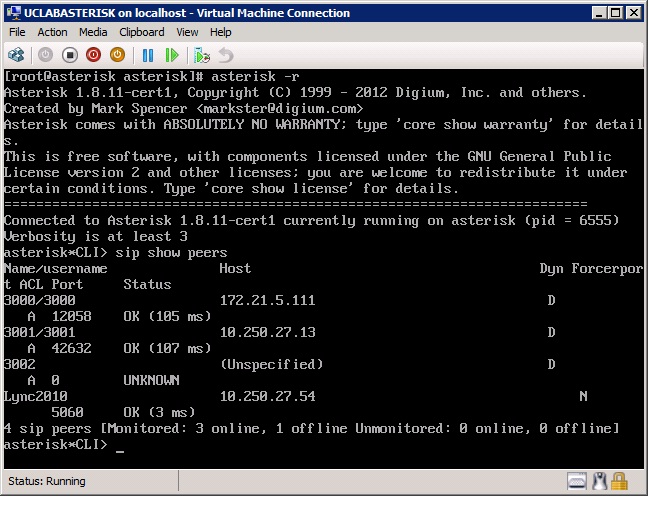
The Cisco phones have extension 4xxx while the Lync clients have 9xxx. Lync 2010 server is running CU6 with colocated mediation server and media bypass enabled. CUCM users and Lync users should be able to call each other with 4 digit extensions. Below shows the 2 Cisco IP phones registered to CUCM:
Let's recap some CUCM Basics before beginning
CUCM Dial Plans typically consists of Directory Numbers, Route Patterns and Translation Patterns:
Directory Numbers (DN) are internal extensions assigned to phones lines, response groups, voicemail attendants etc.
Route Patterns (RP) are used to match numbers for routing to external PSTN gateways or SIP Trunks.
Translation Patterns (TP) are normalization rules used to manipulate dialed digits before routing a call.
When a user dials a number, the digits are send to CUCM which then uses the DN, TP and RP to perform a Digit Analysis process to determine whether to ring another user or send the call to a SIP Trunk or gateway. In Lync we call this Reverse Number Lookup (RNL). To control whether a user has permissions to ring another user or utilize a route to make PSTN or trunk calls, CUCM uses Partitions and Calling Search Spaces.
Partitions are collections of DNs, RPs and TPs that divide the Dial Plan into segments. For example, Partition Chicago contains directory numbers for users in Chicago and the Route Patterns and Translation Patterns for that locale. Any DN, RP or TP that is not assigned to a paritiion belongs into the Null Partition.
Calling Search Spaces (CSS) are an ordered list of Partitions grouped together and assigned to devices. Numbers in a partition are only reachable by devices that are assigned a CSS that contains that partition. Digit Analysis will only process DNs, TPs and RPs within the CSS assigned to the calling device. Therefore CSS controls what numbers a device can call. CSS can be assigned to phone lines, phone devices, gateways and trunks. Numbers not assigned to any Partition belong to the "Null Partition" and are reachable by all devices.
A simple illustration is as follows. If Bob wants to call Ann, then Bob's CSS must contain a Partition that Ann's Directory Number belongs to. Similarly, if Bob wants to make a IDD call through a gateway, Bob's CSS must contain a Partition than the Route Pattern for that gateway belongs to. In some sense, CSS's are like PSTN Usages in Lync.
Media Resource Groups (MRG) are logical groupings of media resources such as conference resources, transcoder resources, MOH servers and Media Termination Points. A Media Resource Group List (MRGL) is simply a prioritized grouping of MRGs. The most common use of MRGs and MRGLs is to restrict media resource usage on a geographic basis. For example, an MRGL can be assigned to a phone at a remote location that only allows it to access local conference bridge resources so that WAN bandwidth is conserved.
Configuring CUCM SIP Trunk
With the baisc CUCM concepts covered, we can proceed to configure the SIP Trunk. As per steps provided in the document, we need to do in the following order:
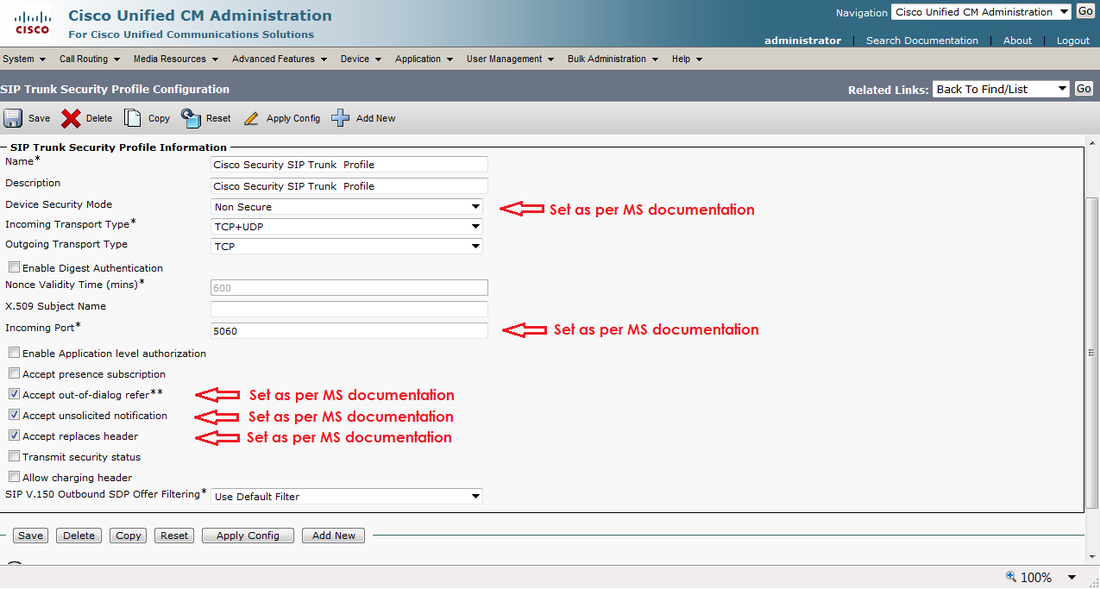
1. Create SIP Trunk Security Profile
2. Create SIP Profile
3. Create SIP Trunk
4. Create Route Pattern
1. Create SIP Trunk Security Profile
In the lab, we created the SIP Trunk Security Profile with no deviations. The screen capture is shown in the diagram below:
1. Create SIP Trunk Security Profile
2. Create SIP Profile
3. Create SIP Trunk
4. Create Route Pattern
1. Create SIP Trunk Security Profile
In the lab, we created the SIP Trunk Security Profile with no deviations. The screen capture is shown in the diagram below:
2. Create SIP Profile
Next, for the SIP Profile, we created as per documentation as well with no deviations as shown below:
Next, for the SIP Profile, we created as per documentation as well with no deviations as shown below:


3. Create SIP Trunk
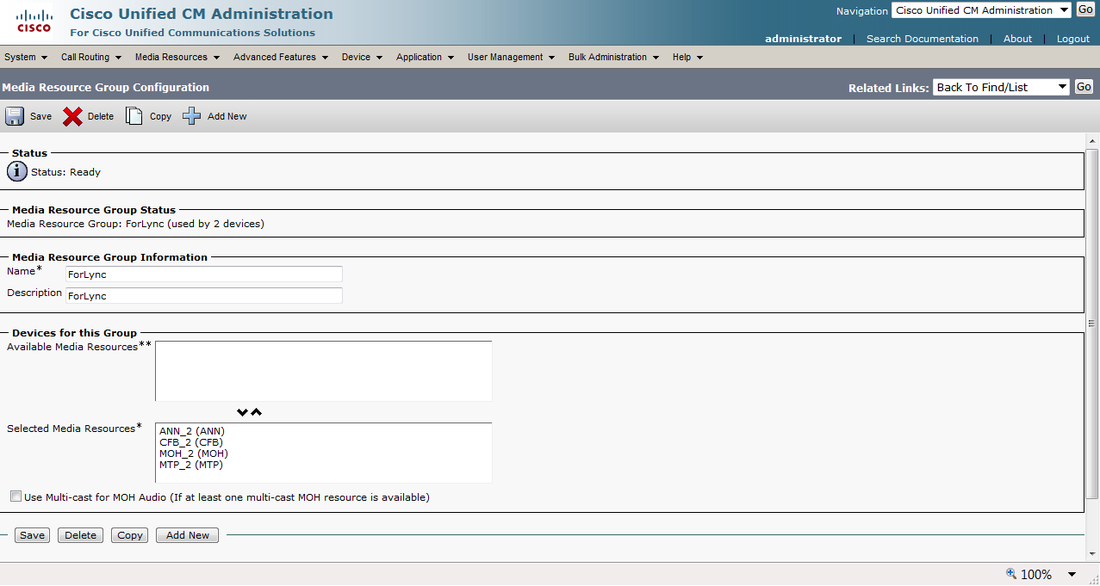
Before creating the SIP Trunk, we need to define a few more items. The first is the Media Resource Group (MRG)which will then be added to a Media Resource Group List (MRGL). The MRG is defined under Media Resources->Media Resource Group and is shown below:
Before creating the SIP Trunk, we need to define a few more items. The first is the Media Resource Group (MRG)which will then be added to a Media Resource Group List (MRGL). The MRG is defined under Media Resources->Media Resource Group and is shown below:
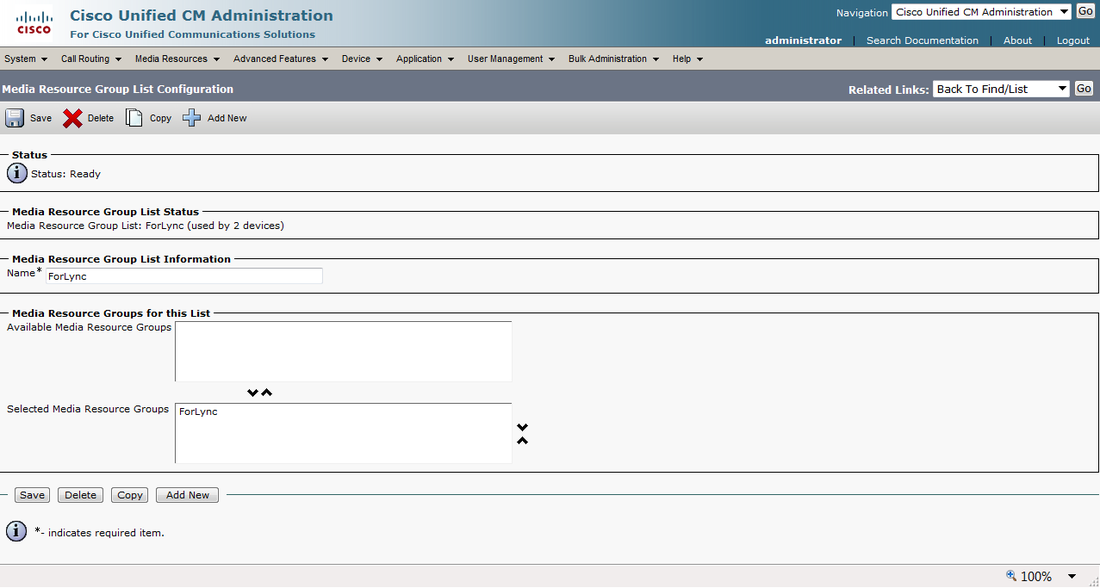
With the MRG defined we then add it into a MGRL created under Media Resources->Media Resource Group list as shown below:
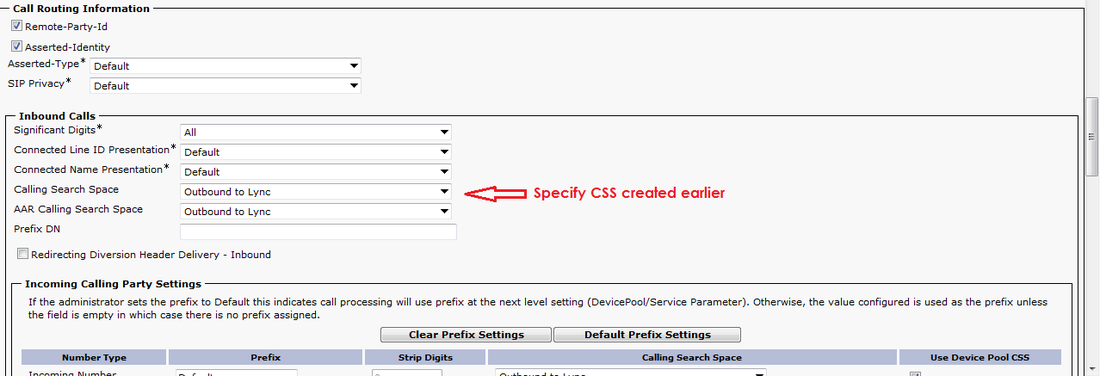
Next item to define before creating the SIP Trunk would be the Calling Search Space (CSS) under Call Routing->Class of Control->Calling Search Space. Our CSS is defined as shown below:
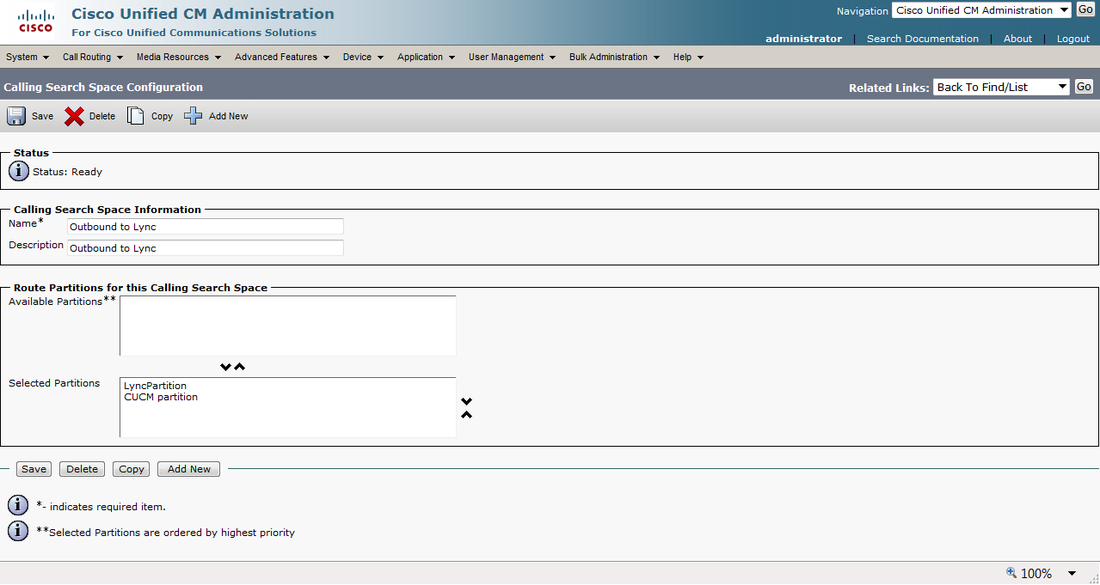
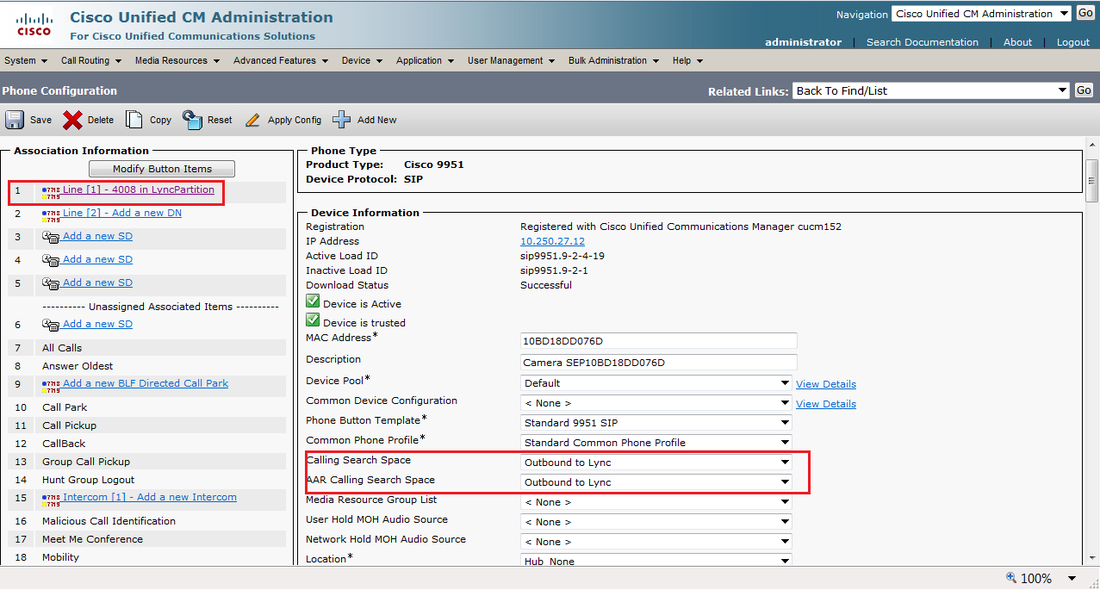
The CSS shown above contains the Route Partition named "LyncPartition" which is defined in the Directory Number (Line[1]) of the Phone Configuration of the two Cisco IP Phones along with the CSS "Outbound to Lync":
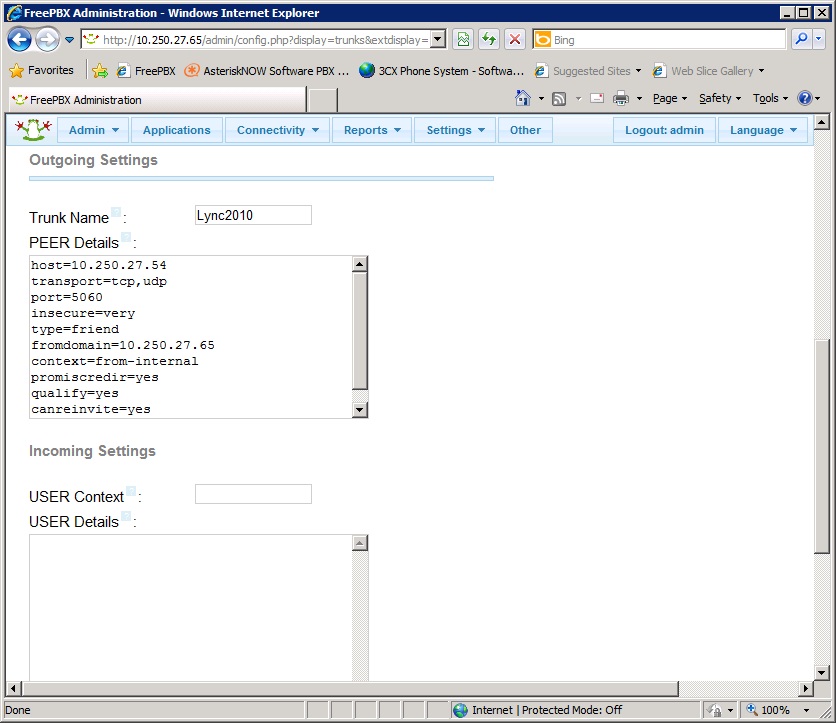
The Route Partition "LyncPartition" contains the necessary translation pattern to translate the incoming number from Lync to CUCM extensions. Translation Patterns can be defined in Call Routing->Translation Pattern and our translation pattern translates E.164 number (without + sign) coming from Lync to a 4-digit CUCM extension:
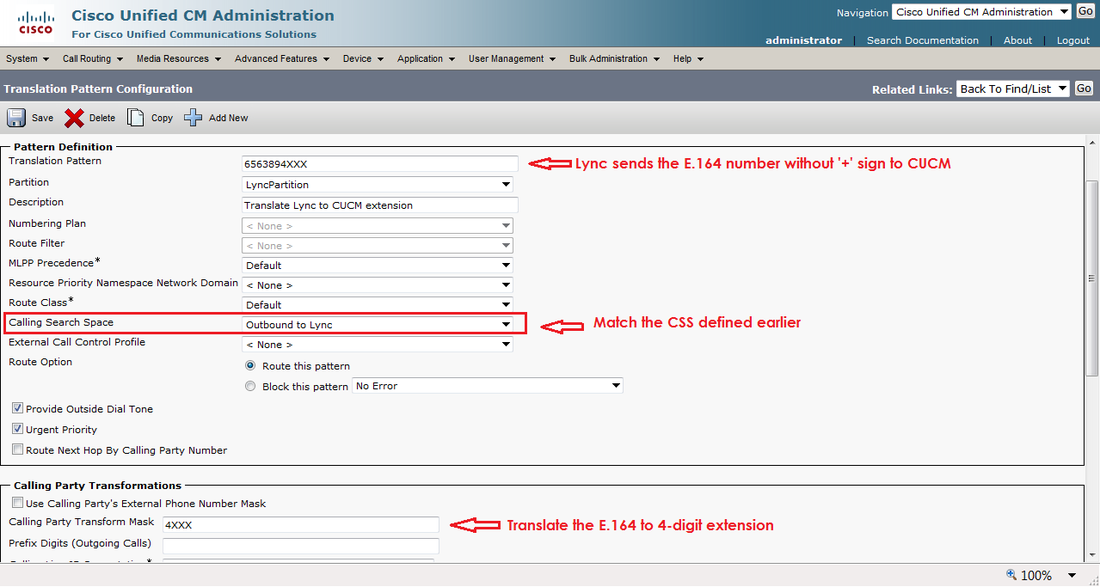
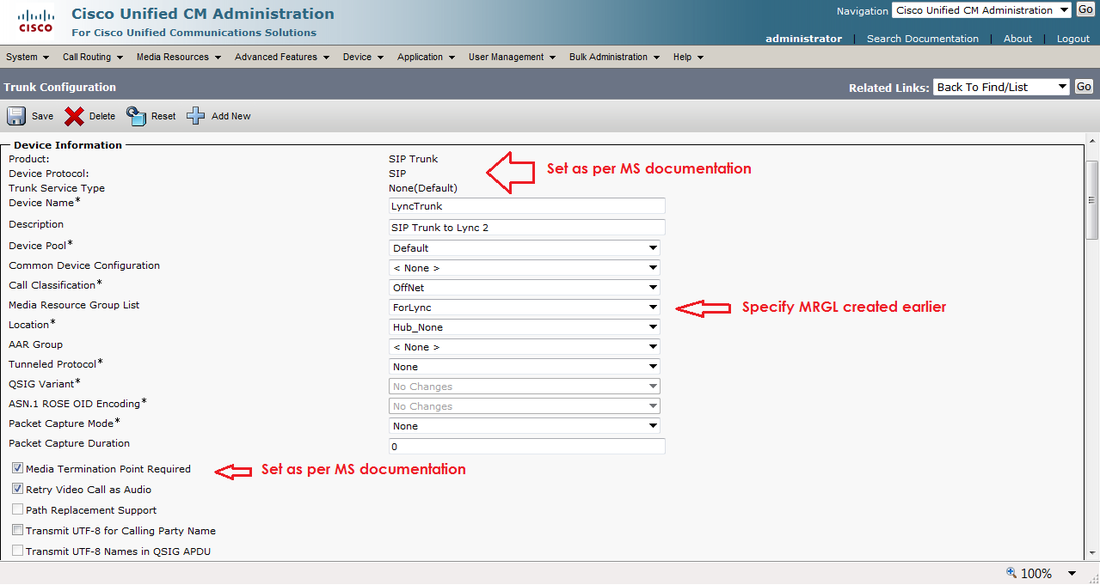
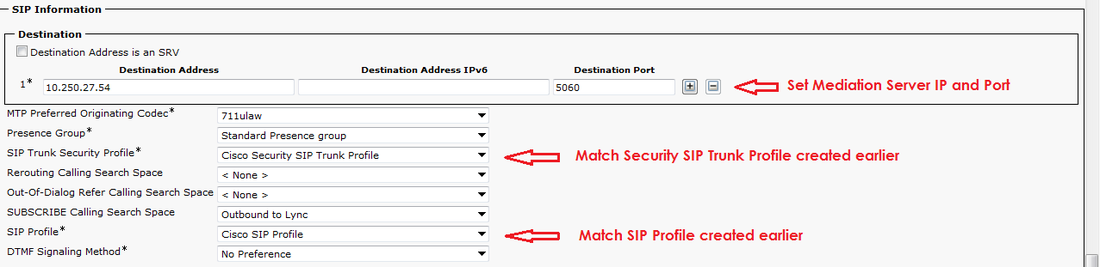
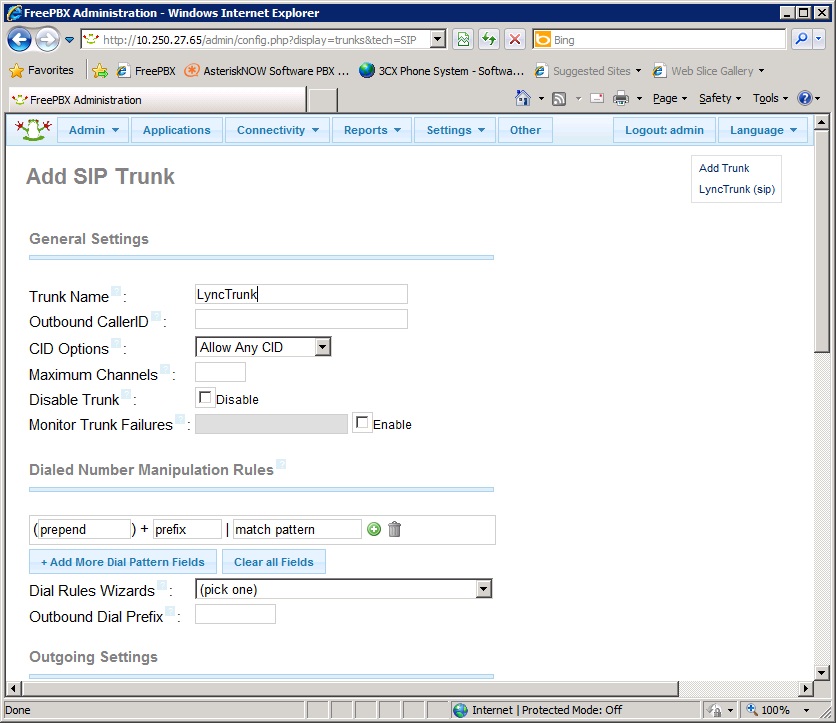
In this lab, we are translating a 4-digit dialed number from Lync to E.164 for CUCM without the + sign. We will be using the Trunk Configuration to do it as shown later. Now we are ready to create the SIP Trunk. This is done under Device->Trunk and we have defined the SIP Trunk as shown below:
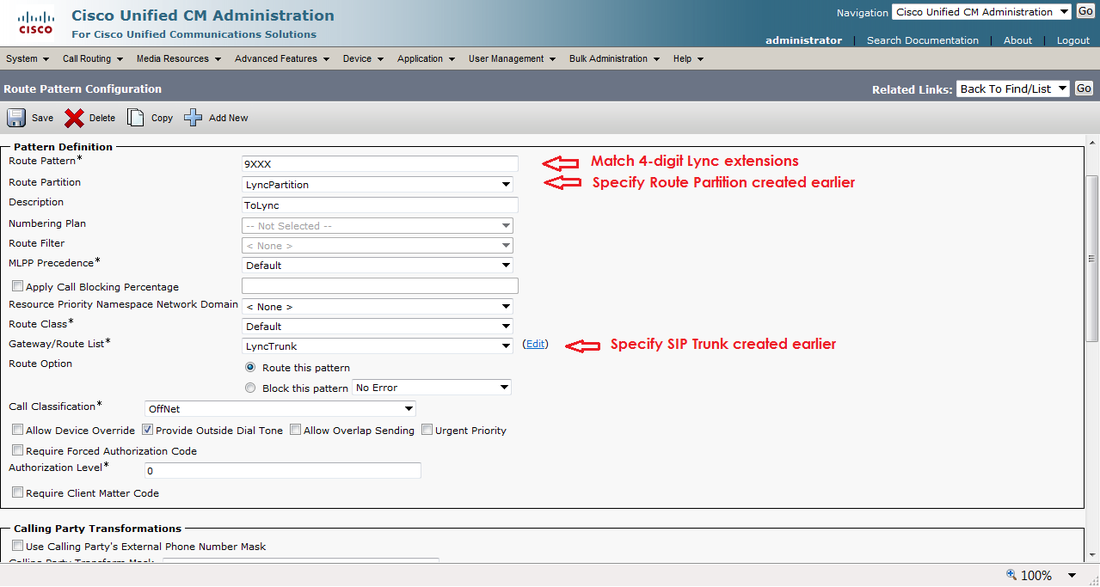
4. Create Route Pattern
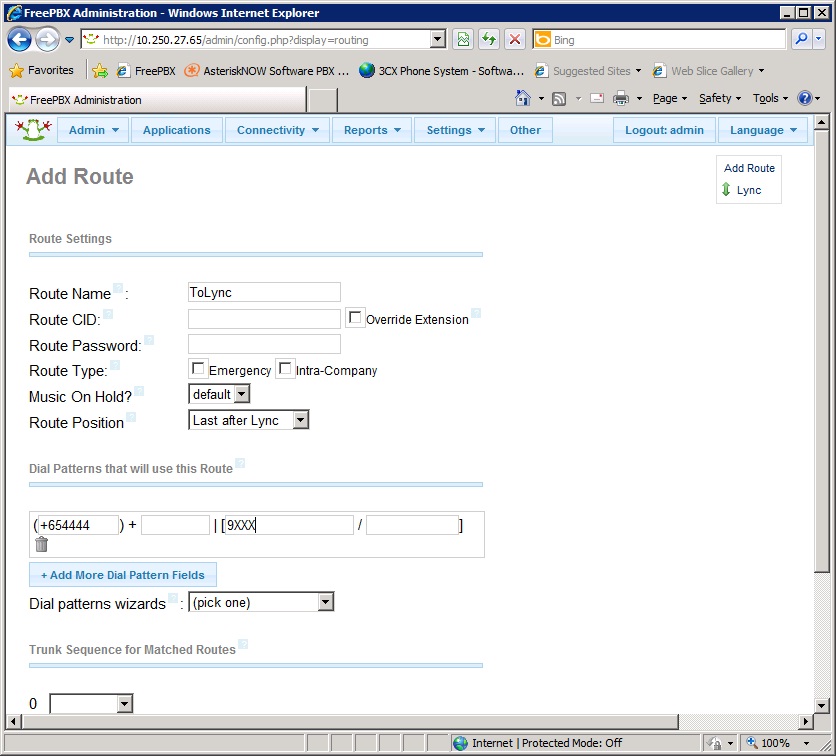
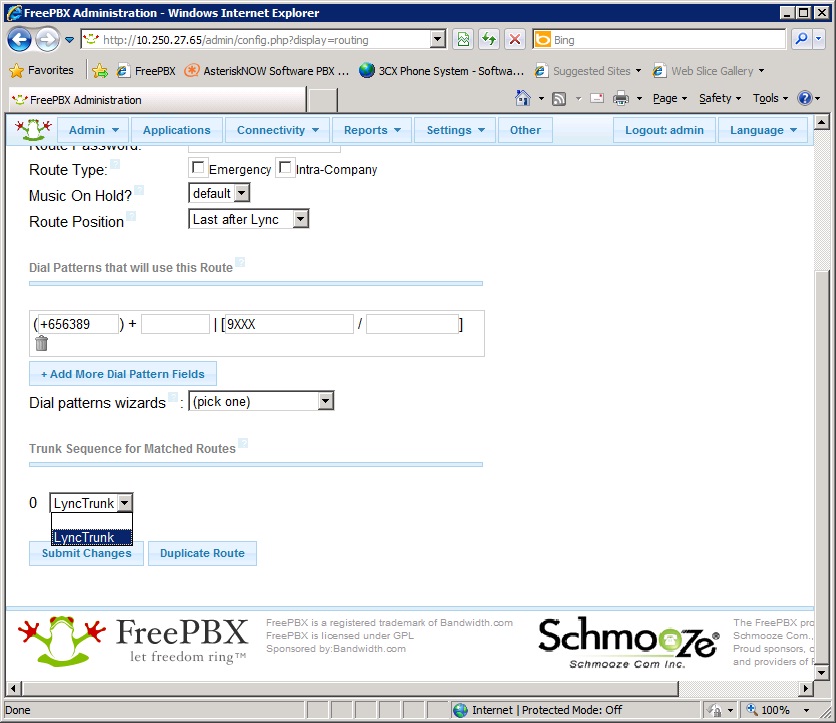
We also need to create Route Patterns for CUCM users to call Lync users using 9XXX 4-digit extensions. This is defined in Call Routing->Route/Hunt->Route Pattern as shown below:
We also need to create Route Patterns for CUCM users to call Lync users using 9XXX 4-digit extensions. This is defined in Call Routing->Route/Hunt->Route Pattern as shown below:

Lync SIP Trunk Configuration for CUCM
As per the MS documentation, these are the tasks to configure Lync Server to perform Direct SIP integration with CUCM:
1. Add CUCM to the Lync topology.
2. Configure the dial plan.
3. Add voice policy and route.
4. Add Trunk configuration.
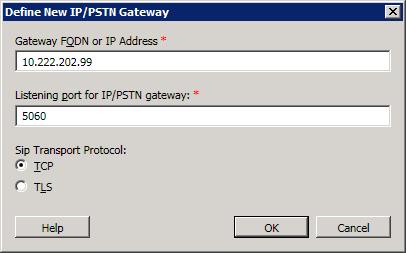
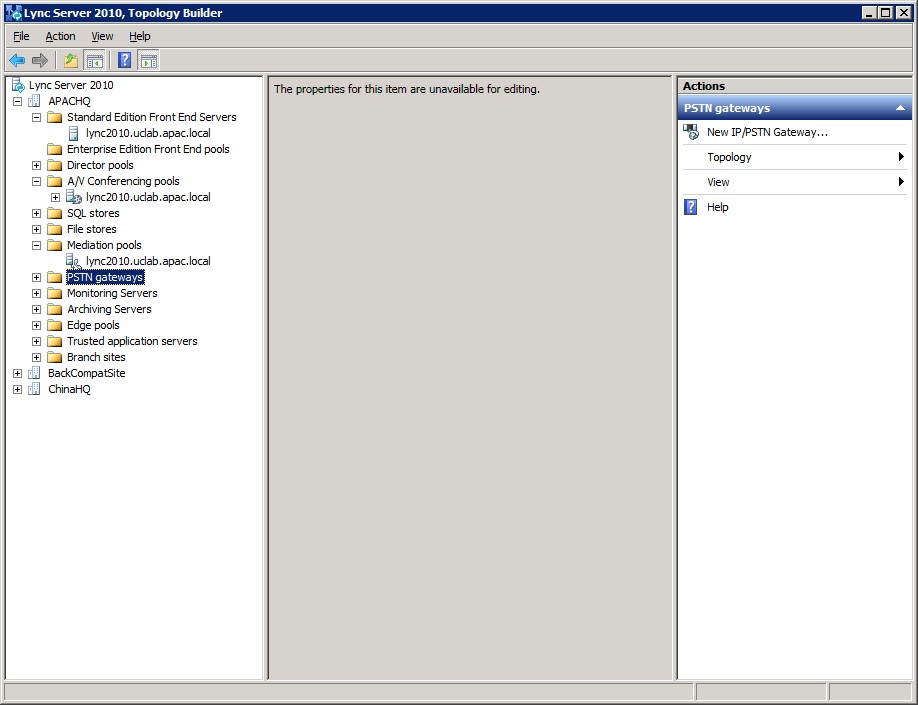
1. Adding CUCM as a PSTN Gateway using Topology Builder
This is fairly straighforward process of using Topology Builder to a new PSTN Gateway using the IP address of CUCM with port 5060 over TCP:
1. Add CUCM to the Lync topology.
2. Configure the dial plan.
3. Add voice policy and route.
4. Add Trunk configuration.
1. Adding CUCM as a PSTN Gateway using Topology Builder
This is fairly straighforward process of using Topology Builder to a new PSTN Gateway using the IP address of CUCM with port 5060 over TCP:
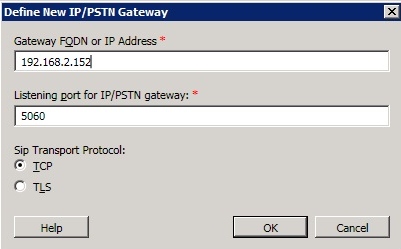
Next we edit the properties of the Mediation Server and add the newly created gateway into the mediation pool:

We then published the topology and made sure there we no errors.
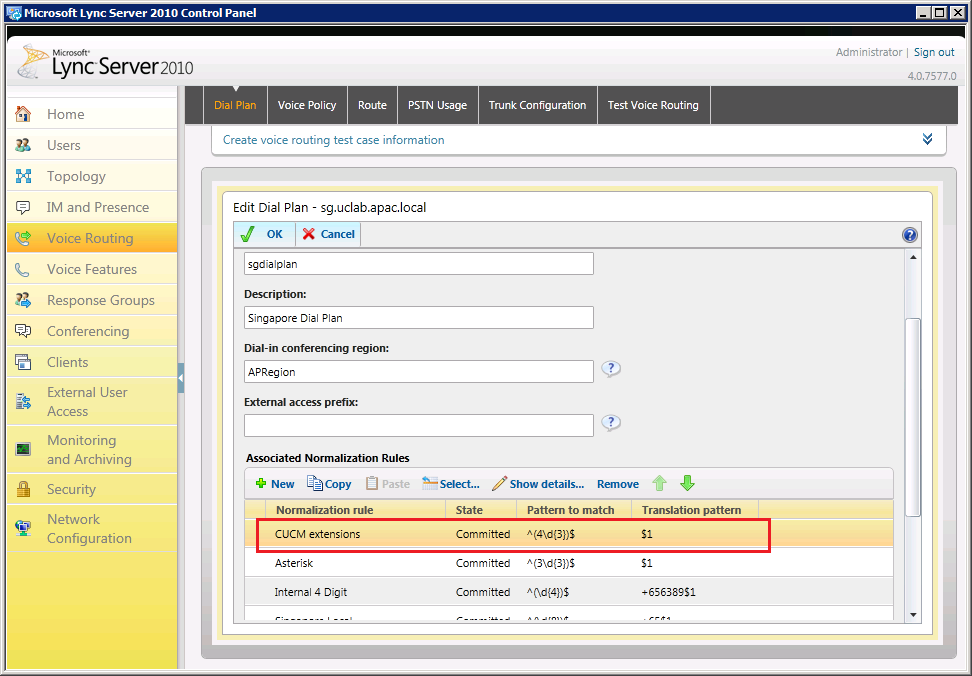
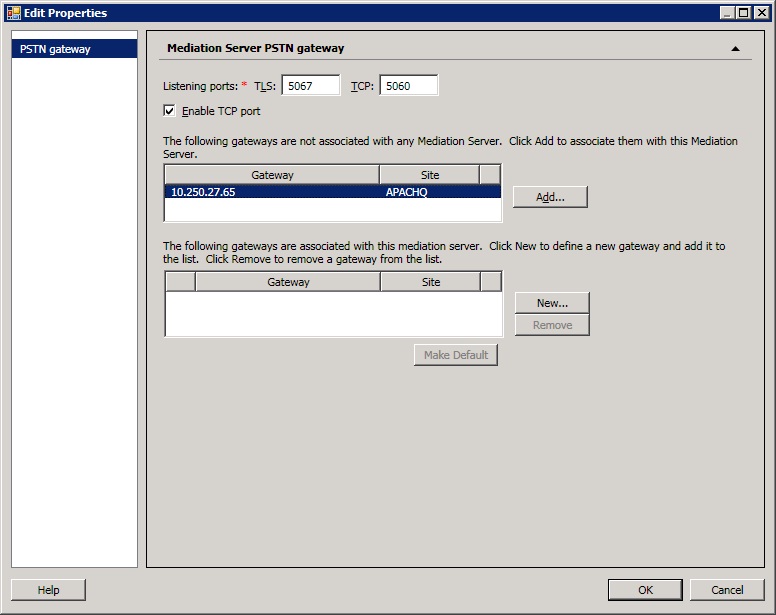
2. Configuring the Dial Plan
We add a normalization rule to the relevent Dial Plan to catch CUCM 4-digit extensions starting with 4XXX. We will perform no translations:
2. Configuring the Dial Plan
We add a normalization rule to the relevent Dial Plan to catch CUCM 4-digit extensions starting with 4XXX. We will perform no translations:
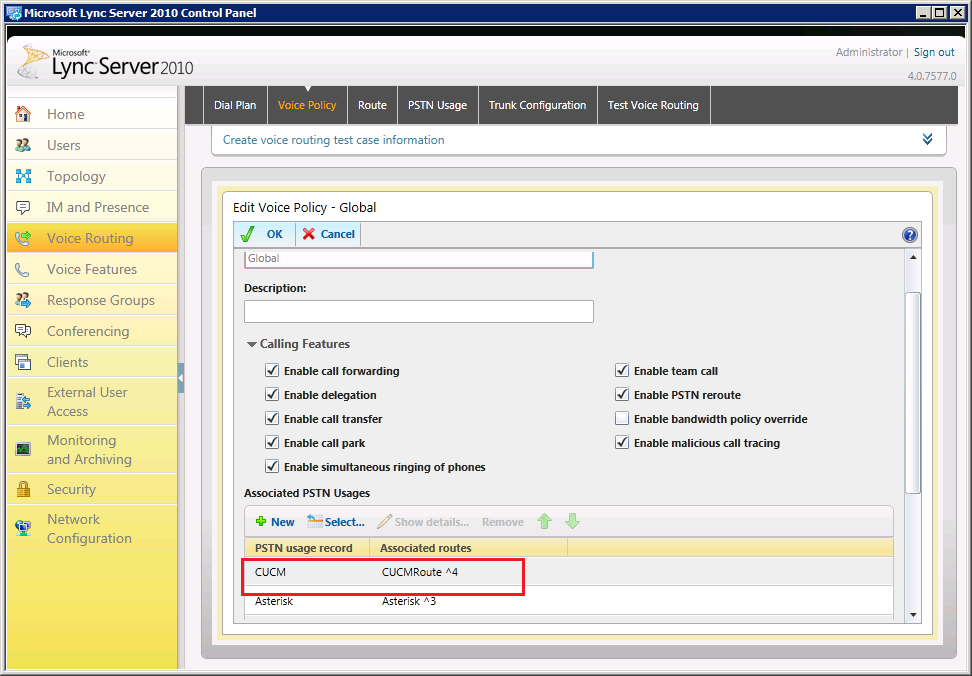
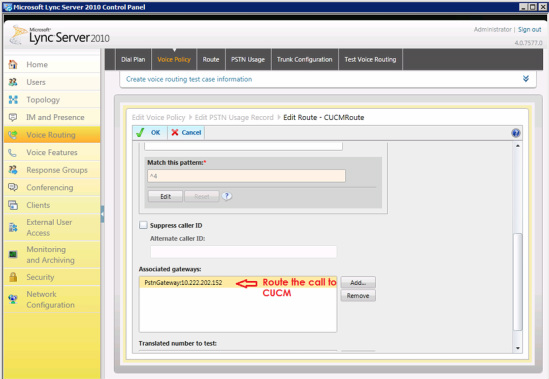
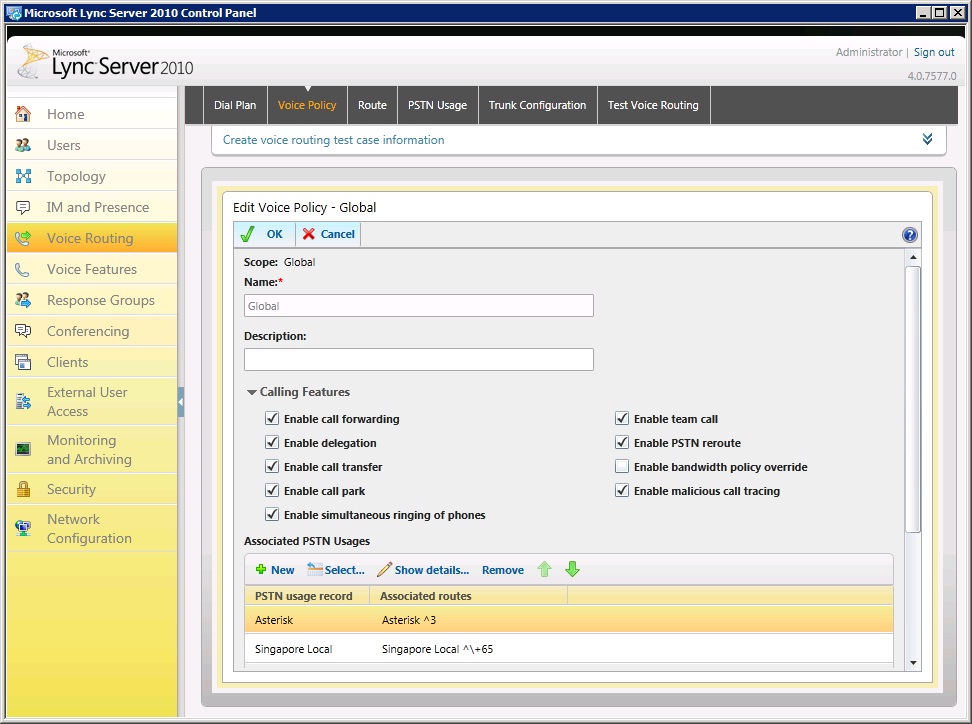
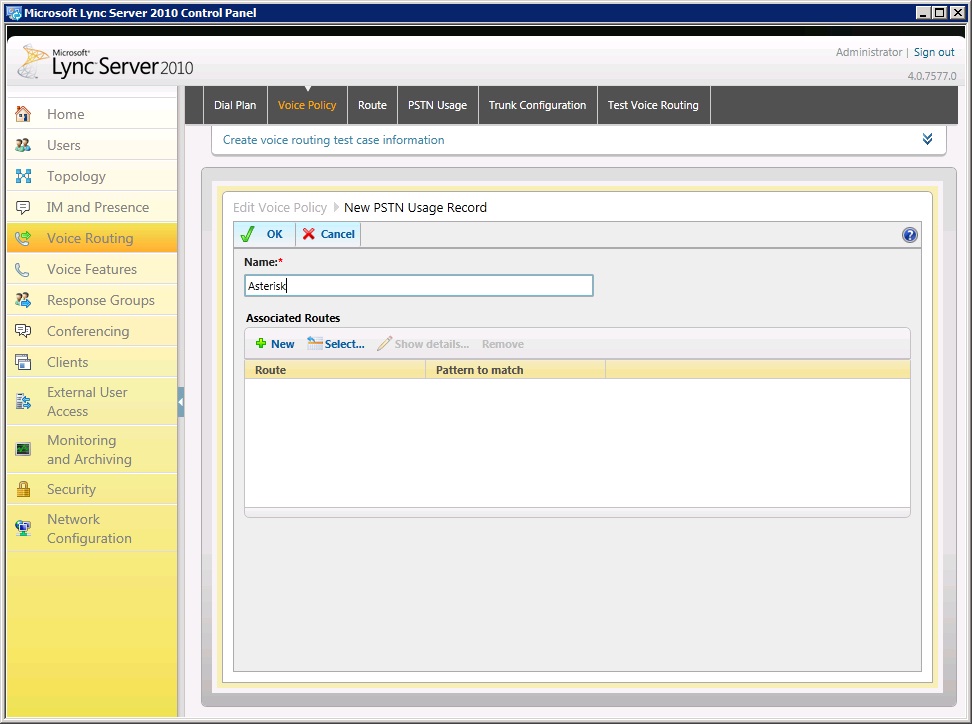
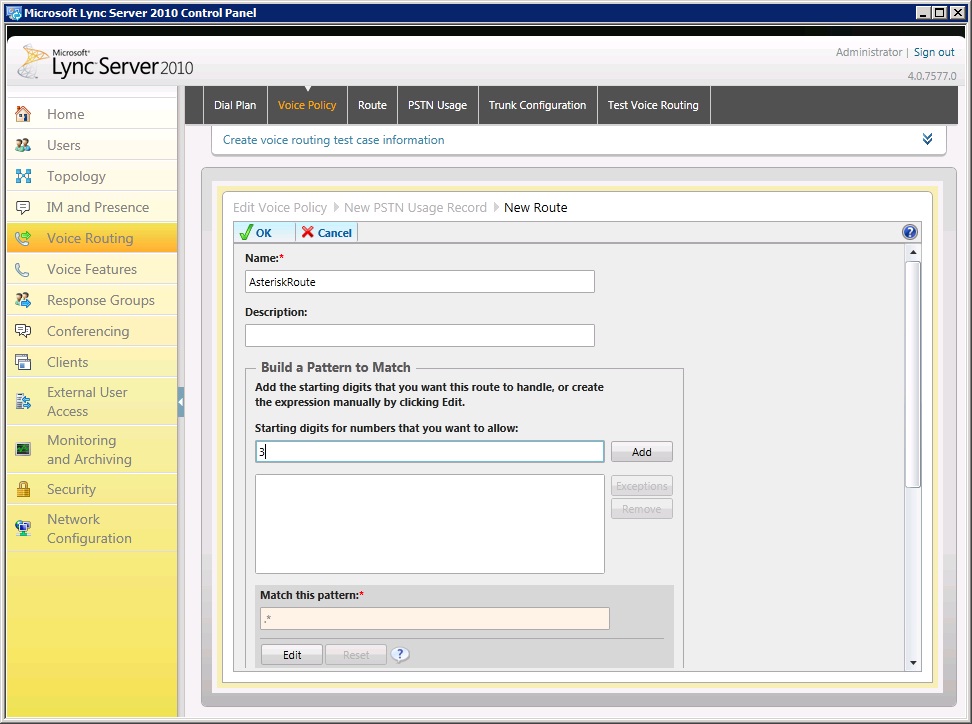
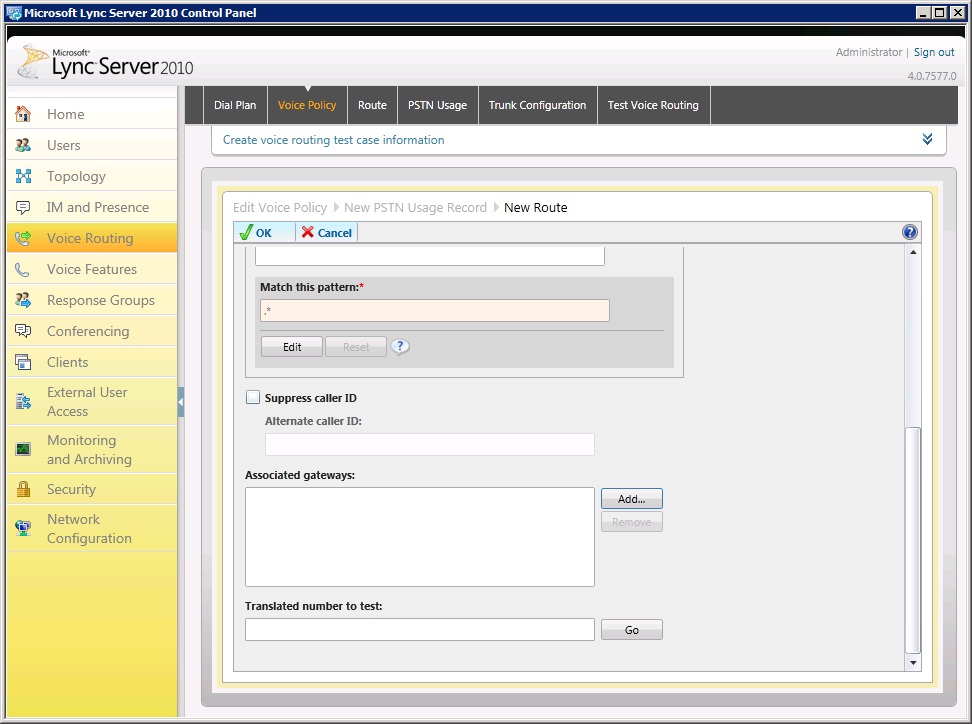
3. Add voice policy and route
Now we edit the Global Voice Policy to add a new PSTN Usage as shown below:
Now we edit the Global Voice Policy to add a new PSTN Usage as shown below:
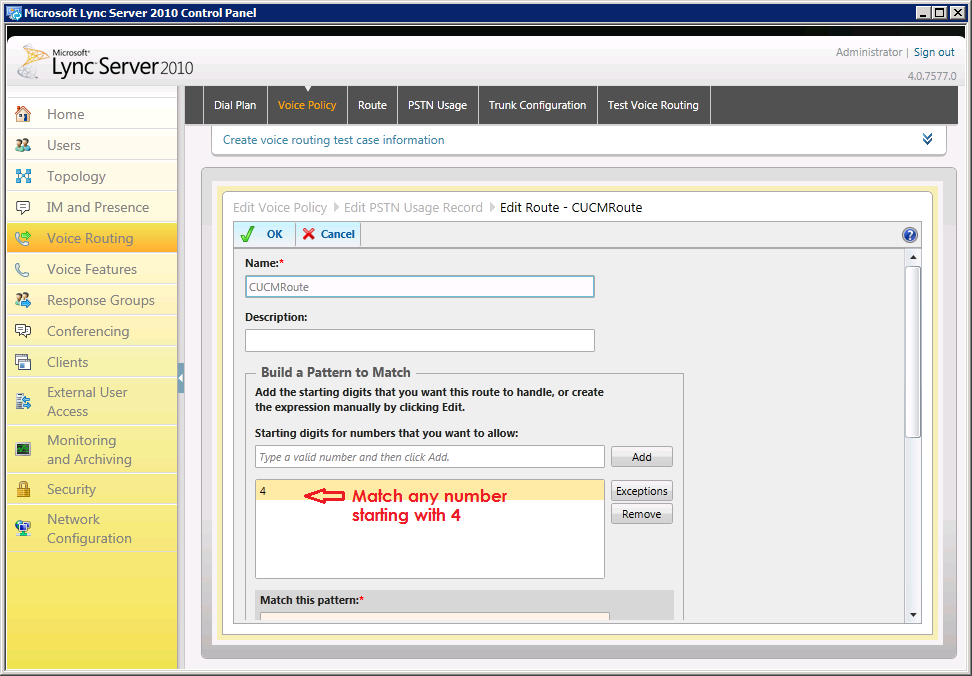
The actual Route matches any dialed number starting with 4 and routes the call to the CUCM as shown below:
4. Add Trunk configuration.
Finaly we add a new Trunk Configuration in Lync. As per the MS documentation, we create a new Pool Trunk Configuration and select the CUCM PSTN Gateway with Encrpytion support set to Optional.
Finaly we add a new Trunk Configuration in Lync. As per the MS documentation, we create a new Pool Trunk Configuration and select the CUCM PSTN Gateway with Encrpytion support set to Optional.
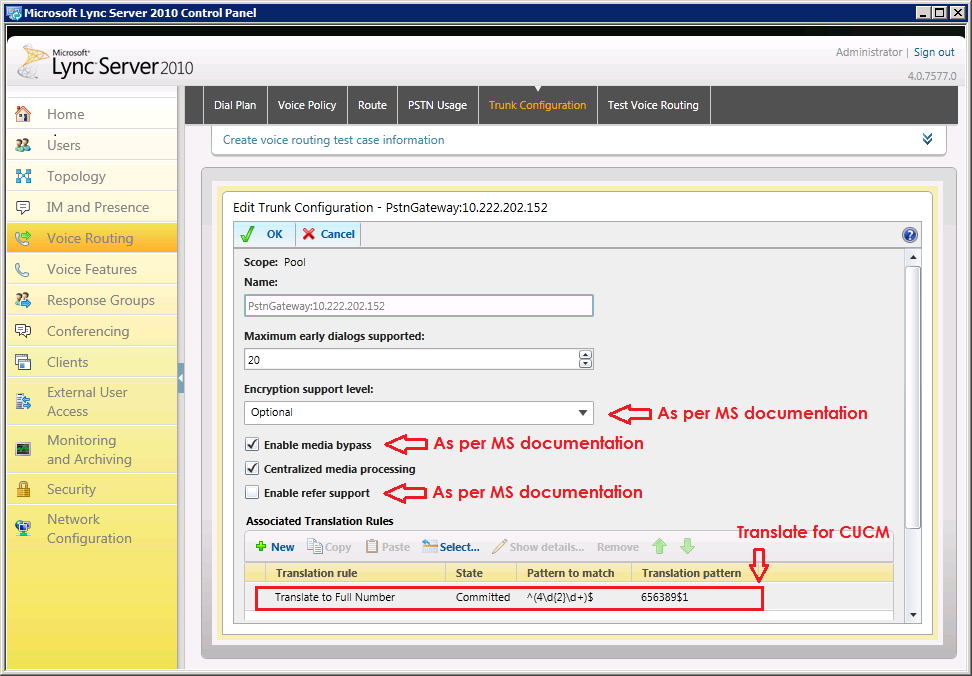
The documentation also specifies enabling Media Bypass and disabling Refer Support followed by running powershell cmdlets to set RTCPActiveCalls and RTCPCallsonHold to false and EnableSessionTime to True:

The remaining steps in the document of enabling Media Bypass in the Global Network Configuration and setting the MediaConfiguration to SupportEncryption are straightforward and are not repeated here. Simply follow the steps in the document.
Q850.1 Errors
We were getting call failures in the beginning and Lync Server's SIP Trace shows errors as below:
ms-diagnostics:
10404;source="LYNC2010.uclab.apac.local";reason="Gateway responded with 404 Not Found (User Not Found)";component="MediationServer";SipResponseCode="404";SipResponseText="Not Found";sip-reason="Q.850;cause=1";GatewayFqdn="10.222.202.152"
ms-diagnostics-public: 10404;reason="Gateway responded with 404 Not Found (User Not Found)";component="MediationServer";SipResponseCode="404";SipResponseText="Not Found";sip-reason="Q.850;cause=1"
Reason: Q.850;cause=1
ms-trunking-peer: 10.222.202.152
ms-endpoint-location-data: NetworkScope;ms-media-location-
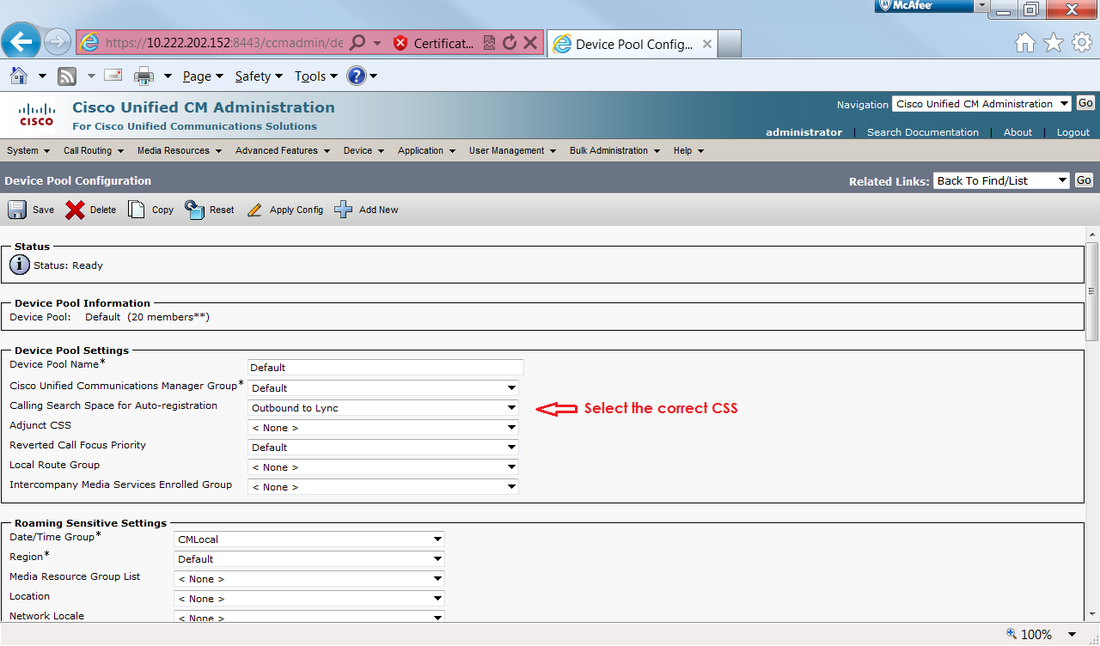
Based on the ITU Recommendation Q.850, this error is due to "Unallocated (Unassigned) number". Later we found this to be due to the Device Pool that the CUCM Phones were in did not contain the correct CSS. Device Pools are defined under System->Device Pool. After selecting the correct CSS in the Device Pool, then all was fine and we are able to get calls to/from Lync and CUCM working:
ms-diagnostics:
10404;source="LYNC2010.uclab.apac.local";reason="Gateway responded with 404 Not Found (User Not Found)";component="MediationServer";SipResponseCode="404";SipResponseText="Not Found";sip-reason="Q.850;cause=1";GatewayFqdn="10.222.202.152"
ms-diagnostics-public: 10404;reason="Gateway responded with 404 Not Found (User Not Found)";component="MediationServer";SipResponseCode="404";SipResponseText="Not Found";sip-reason="Q.850;cause=1"
Reason: Q.850;cause=1
ms-trunking-peer: 10.222.202.152
ms-endpoint-location-data: NetworkScope;ms-media-location-
Based on the ITU Recommendation Q.850, this error is due to "Unallocated (Unassigned) number". Later we found this to be due to the Device Pool that the CUCM Phones were in did not contain the correct CSS. Device Pools are defined under System->Device Pool. After selecting the correct CSS in the Device Pool, then all was fine and we are able to get calls to/from Lync and CUCM working:
Calling Experience
As mentioned in the beginning, both CUCM users were able to call the Lync users using 4-digit extensions. It also happens that the CUCM users were signed in on phones capable of doing video. The Lync users were signed in on Polycom VVX600 phones running firmware 4.1.2.22625. The 9951 Cisco phones are capable of video when calling each other, but not with Lync due to the way Lync handles calls via the PSTN Gateway which only advertises audio capabilities in the SIP INVITE:
TL_INFO(TF_PROTOCOL) [0]0A10.1A24::02/13/2013-08:53:41.995.001d4d01 (S4,SipMessage.DataLoggingHelper:sipmessage.cs(686))[4068699085]
<<<<<<<<<<<<Incoming SipMessage c=[<SipTlsConnection_1099E63>], 10.250.27.54:5070<-10.250.27.67:63337
INVITE sip:[email protected]:5070;user=phone;transport=tls;maddr=lync2010.uclab.apac.local SIP/2.0
FROM: "Brennon Kwok" <sip:[email protected]>;tag=E1DEB21B-9B674EF4;epid=0004f2ae4b0d
TO: <sip:4007;[email protected];user=phone>
CSEQ: 1 INVITE
CALL-ID: 5b36d69dccfe4b1b3eae46c179ae4b0d
MAX-FORWARDS: 69
VIA: SIP/2.0/TLS 10.250.27.67:63337;branch=z9hG4bK85B5D519.F2C2544BA9E4FC96;branched=TRUE
VIA: SIP/2.0/TLS 10.250.27.13:35425;branch=z9hG4bK682046e83E0C5E49;ms-received-port=35425;ms-received-cid=540C500
RECORD-ROUTE: <sip:EEPool.uclab.apac.local:5061;transport=tls;ms-fe=LyncEE1.uclab.apac.local;opaque=state:T;lr>;tag=92BEAF9383A0D959E9B155C0472C72CB
ALLOW-EVENTS: conference,talk,hold
CONTACT: <sip:[email protected];opaque=user:epid:4WChQ84TxlyATEooiiwYcwAA;gruu>
CONTENT-LENGTH: 1485
SUPPORTED: replaces
SUPPORTED: ms-safe-transfer
SUPPORTED: ms-bypass
SUPPORTED: ms-dialog-route-set-update
SUPPORTED: timer
SUPPORTED: 100rel
SUPPORTED: gruu-10
USER-AGENT: PolycomVVX-VVX_600-UA/4.1.2.22625
CONTENT-TYPE: application/sdp
ACCEPT-LANGUAGE: en
ALLOW: INVITE, ACK, BYE, CANCEL,
OPTIONS, INFO, MESSAGE, SUBSCRIBE, NOTIFY, PRACK, UPDATE, REFER
P-ASSERTED-IDENTITY: "Brennon Kwok"<sip:[email protected]>,<tel:+6563899228;ext=9228>
ms-application-via: SIP;ms-urc-rs-from;ms-server=LyncEE1.uclab.apac.local;ms-pool=EEPool.uclab.apac.local;ms-application=ad894dc3-55e0-44bf-a07e-3c073aaa4a57
ms-application-via: LYNCMON.uclab.apac.local_;ms-server=LyncEE1.uclab.apac.local;ms-pool=EEPool.uclab.apac.local;ms-application=51FB453D-5B9F-45df-83B4-ADD1F7E604A8
ms-routing-phase: from-uri-routing-done
ms-user-data: ms-publiccloud=TRUE;ms-federation=TRUE
v=0
o=- 1360745635 1360745635 IN
IP4 10.250.27.13
s=Polycom IP Phone
c=IN IP4 10.250.27.13
t=0 0
a=sendrecv
m=audio 2230 RTP/AVP 115 9 112 0 8 18 127
a=rtcp:2231
a=candidate:1 1 UDP 2130706431 10.250.27.13 2230 typ host
a=candidate:1 2 UDP 2130706430 10.250.27.13 2231 typ host
a=candidate:2 1 TCP-PASS 6619135 10.250.27.142 51773 typ relay raddr 10.250.27.13 rport 39949
a=candidate:2 2 TCP-PASS 6619134 10.250.27.142 51773 typ relay raddr 10.250.27.13 rport 39949
a=candidate:3 1 UDP 16777215 10.250.27.142 53415 typ relay raddr 10.250.27.13 rport 2730
a=candidate:3 2 UDP 16777214 10.250.27.142 52115 typ relay raddr 10.250.27.13 rport 2731
a=candidate:4 1 TCP-ACT 7012351 10.250.27.142 51773 typ relay raddr 10.250.27.13 rport 39949
a=candidate:4 2 TCP-ACT 7012350 10.250.27.142 51773 typ relay raddr 10.250.27.13 rport 39949
a=candidate:5 1 TCP-ACT 1684733951 10.250.27.13 39949 typ srflx raddr 10.250.27.13 rport 39949
a=candidate:5 2 TCP-ACT 1684733950 10.250.27.13 39949 typ srflx raddr 10.250.27.13 rport 39949
a=crypto:2 AES_CM_128_HMAC_SHA1_80 inline:88sc2BjOStOMZ4A1VyLXlTiliS5xo/C6oKB6Ro1z|2^31|1:1
a=x-bypassid:68628bf5-5ec3-4b6a-a2c3-6ca33793a892
a=rtpmap:115 G7221/32000
a=fmtp:115 bitrate=48000
a=rtpmap:9 G722/8000
a=rtpmap:112 G7221/16000
a=fmtp:112 bitrate=24000
a=rtpmap:0 PCMU/8000
a=rtpmap:8 PCMA/8000
a=rtpmap:18 G729/8000
a=fmtp:18 annexb=no
a=rtpmap:127 telephone-event/8000
a=ice-pwd:LY9UIrMskLLh8sBCncz5PtUU
a=ice-ufrag:YoEu
------------EndOfIncoming
SipMessage
Conclusion
So it was not trivial to integrate Lync and CUCM even in a simple lab environment but the documentation provided by MS does help tremdously; many thanks to the authors. We hope this article is useful for those who want to test CUCM integration with Lync and many thanks also to my coleague HB Low for providing much assistance on CUCM.


 RSS Feed