
 | On Aug 22, Microsoft released version 1.4.1 of the Skype for Business Cloud Connector Edition with several new features such as a smaller hardware specification that supports 50 concurrent calls, as well as support for REFER and Forwarding PAI from Mediation Server to PSTN Gateway. Just as a recap, Cloud Connector Edition is a minimum topology of Skype for Business Server comprising of 4 VMs per instance that allows Office365 Skype for Business Online users to leverage existing on-premise PSTN connectivity. This is particularly useful for users in countries where PSTN Calling Service from Microsoft is not yet available, or in cases where users still want to leverage existing on-premise PSTN infrastructure. This blog post is the first part of a series that walks through the setup and configuration of CCE1.4.1 in a lab environment for testing and learning purposes and deploys a single instance of CCE with a single SIP domain. |
1. Pre-Requisites
To host a single CCE instance of 4 VMs, the host server needs to be running Windows Server 2012 R2 Datacenter Edition with Hyper-V. Note that VMWare hypervisors are not supported. For a instance of CCE 1.4.1 with minimal hardware supporting 50 concurrent calls, we need the following:
Host Server Hardware:
Intel i7 4790 quad core with Intel 4600 Graphics (no high end graphics needed)
32 GB DDR3-1600 non ECC RAM
2 x 1TB 7200RPM SATA III (6 Gbps) in RAID 0 Storage
2 x 1 Gbps Ethernet (RJ45) network
Host Server Software:
Windows Server 2012 R2 Datacenter Edition running on the host machine
Windows Server 2012 R2 Standard Edtion ISO image file to build the VMs
Skpe for Business Online Powershell Module - download from http://www.microsoft.com/en-us/download/details.aspx?id=39336
CCE 1.4.1 installer - download from http://aka.ms/getcce141
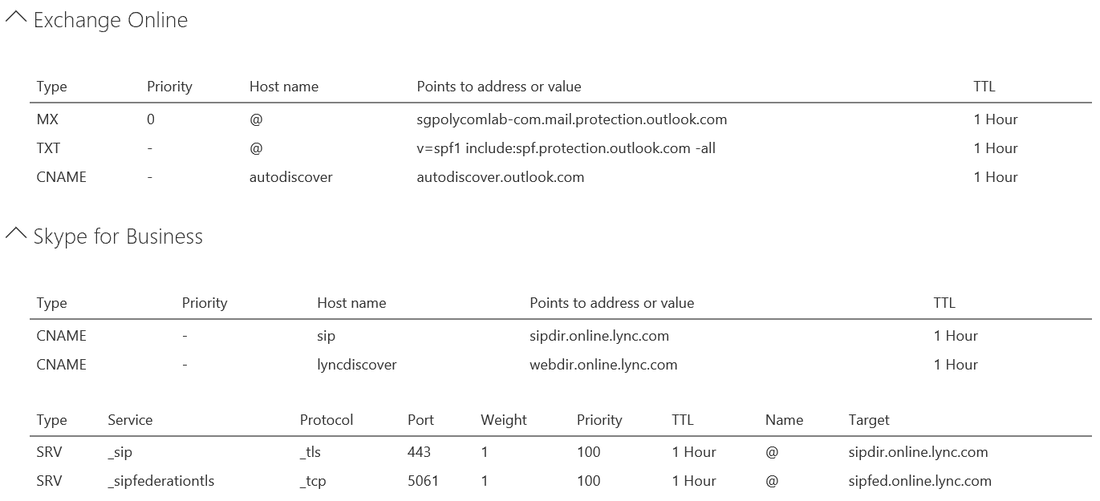
In this lab we are using a 60-day trial Office365 E5 tenant which can be obtained from the Microsoft website. We also need a public DNS domain for our tenant which we obtained from GoDaddy. One of the first tasks here is to add the public DNS domain to our tenant by clicking on the "Add a Domain" button in the Office365 Admin Portal home page and a wizard will guide you through the setup which is fairly straightforward. The advantage of using a DNS domain from GoDaddy is that the setup process can automatially create the necessary DNS records if you enter the GoDaddy admin credentials. Once completed, you should have the following DNS records created in your DNS Zone:
To host a single CCE instance of 4 VMs, the host server needs to be running Windows Server 2012 R2 Datacenter Edition with Hyper-V. Note that VMWare hypervisors are not supported. For a instance of CCE 1.4.1 with minimal hardware supporting 50 concurrent calls, we need the following:
Host Server Hardware:
Intel i7 4790 quad core with Intel 4600 Graphics (no high end graphics needed)
32 GB DDR3-1600 non ECC RAM
2 x 1TB 7200RPM SATA III (6 Gbps) in RAID 0 Storage
2 x 1 Gbps Ethernet (RJ45) network
Host Server Software:
Windows Server 2012 R2 Datacenter Edition running on the host machine
Windows Server 2012 R2 Standard Edtion ISO image file to build the VMs
Skpe for Business Online Powershell Module - download from http://www.microsoft.com/en-us/download/details.aspx?id=39336
CCE 1.4.1 installer - download from http://aka.ms/getcce141
In this lab we are using a 60-day trial Office365 E5 tenant which can be obtained from the Microsoft website. We also need a public DNS domain for our tenant which we obtained from GoDaddy. One of the first tasks here is to add the public DNS domain to our tenant by clicking on the "Add a Domain" button in the Office365 Admin Portal home page and a wizard will guide you through the setup which is fairly straightforward. The advantage of using a DNS domain from GoDaddy is that the setup process can automatially create the necessary DNS records if you enter the GoDaddy admin credentials. Once completed, you should have the following DNS records created in your DNS Zone:
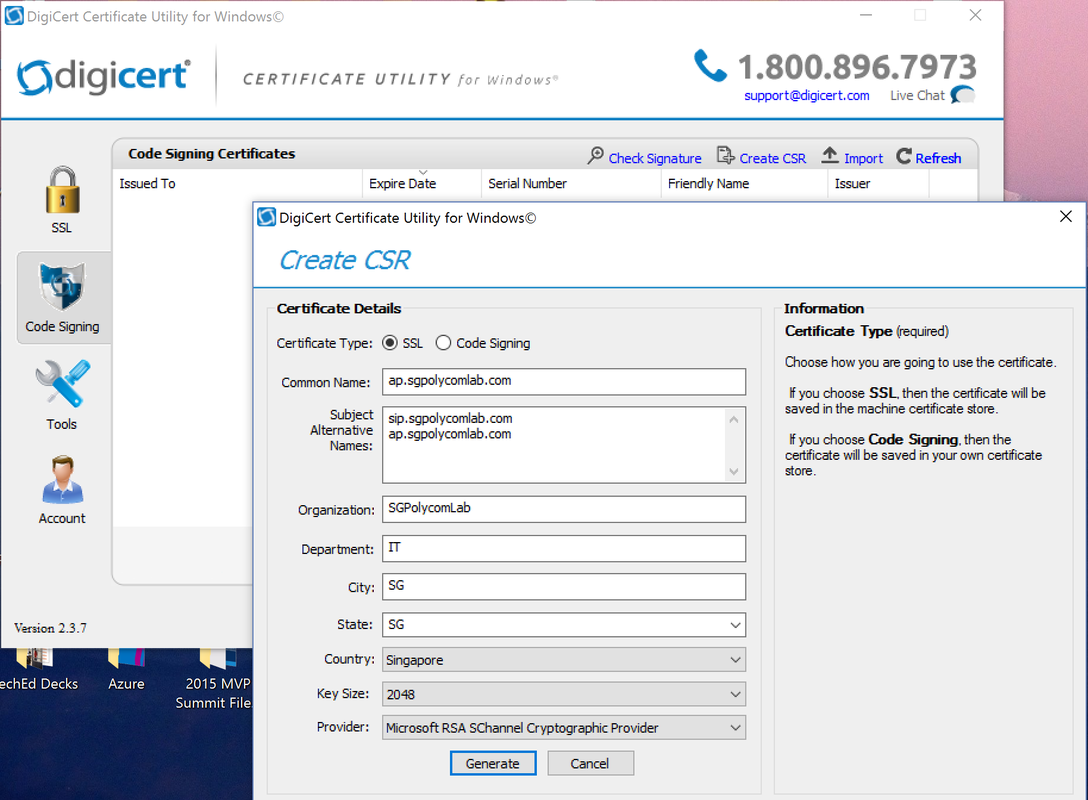
A public SSL certificate is required on the Edge Server VM's external network interface. In this lab, we are using DigiCert as our SSL Cert provider and they provide a great free tool called the DigiCert SSL Utility for creating and managing SSL cerfificates. For this external Edge SSL certificate, we cannot use sip.<sipdomain.com> as the SN as that is reserved by the Office 365 infrastructure. For this lab, the certificate details are simply:
SN: ap.sgpolycomlab.com
SAN: sip.sgpolycomlab.com, ap.sgpolycomlab.com
We can use the DigiCert util to first create the CSR and then submit the CSR to DigiCert:
SN: ap.sgpolycomlab.com
SAN: sip.sgpolycomlab.com, ap.sgpolycomlab.com
We can use the DigiCert util to first create the CSR and then submit the CSR to DigiCert:
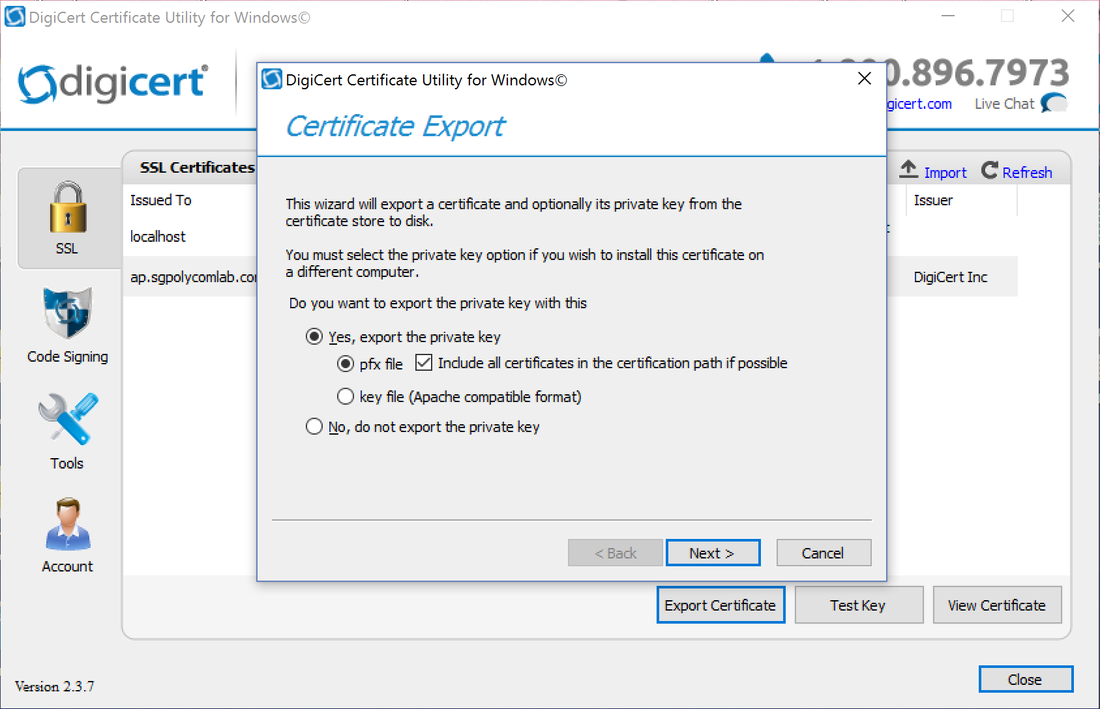
After DigiCert has issued the SSL certificate, we import it back into the DigiCert Utility and then epxort the cert along with the private key as a .pfx file. We then save this file to the host server for use later during VM preparation:
On the host server, we need to enable the Hyper-V role and assign 2 NICs to the virtual switch. The host server should sit in the peimeter network with one NIC connected to the internal corporate network and the other NIC to the internet facing network. The firewall rules for the internal and external firewalls are well documented in this article https://technet.microsoft.com/en-us/library/mt605227.aspx and thus not repeated here. We use the recommended names for the NICs as follows:

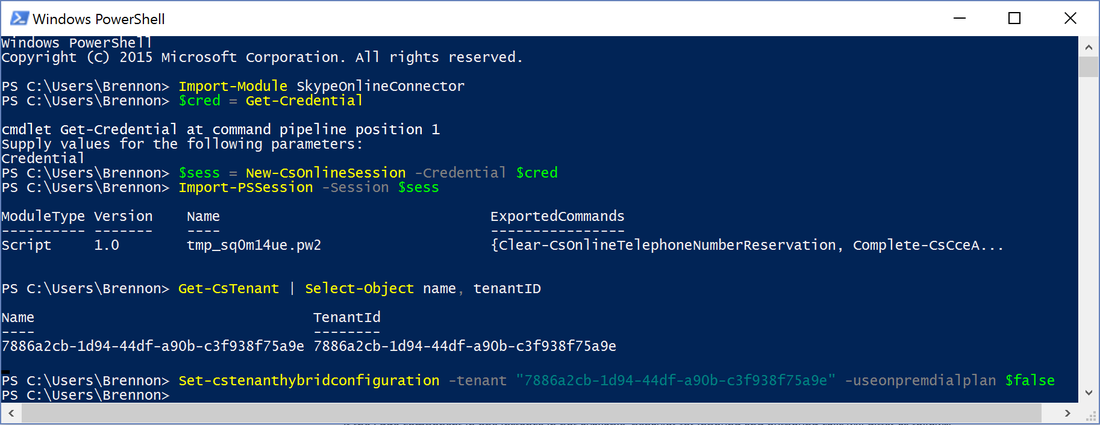
Finally, its worthwhile noting that CCE1.4.1 does not support any on-premise dial plans as there is no registrar component in the instance. All CCE users must be assigned the online dial plan by running the following cmdlet on the tenant:
set-CsHybridTenantConfiguration -tenant <TenantID> -useOnPremDIalPlan $false
set-CsHybridTenantConfiguration -tenant <TenantID> -useOnPremDIalPlan $false
2. Preparing to Deploy CCE
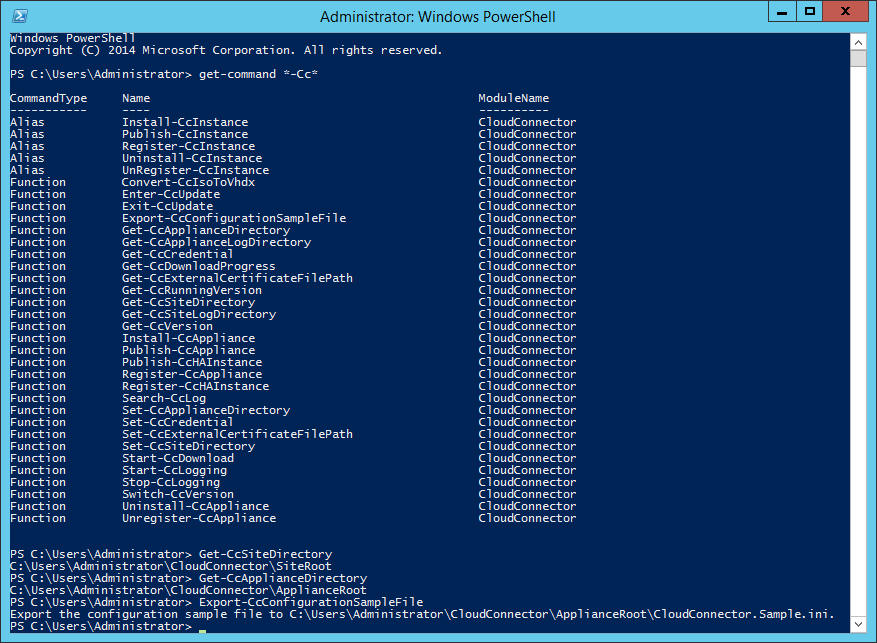
Once we have installed the CCE bits on our host machine, we can run several powershell commands to make sure the installation was successful. The following commands will return a list of CCE related cmdlet as well as retrieve the default directory locations used by CCE such as SiteDirectory and the ApplianceDirectory:
Once we have installed the CCE bits on our host machine, we can run several powershell commands to make sure the installation was successful. The following commands will return a list of CCE related cmdlet as well as retrieve the default directory locations used by CCE such as SiteDirectory and the ApplianceDirectory:
Now is also a good time to place the Windows Server 2012 R2 Standard ISO image file and the SSL certificate .pfx file into the root directory C:\users\administrator\CloudConnector but of course you can choose any other desired directory. Then set the certificate path by running Set-CcExternalCertificateFilePath -Path <Full path to External certificate, including file name> cmdlet.
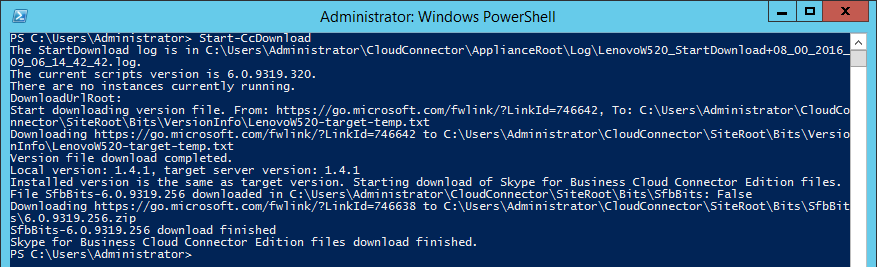
Next, we can start downloading the necessary CCE bits using the Start-CcDownload cmdlet. Note that the SfB CCE Corpnet Swtich must have internet connectivity for this to work. This may take some time so feel free to go for a lunch break after initiating the download:
Next, we can start downloading the necessary CCE bits using the Start-CcDownload cmdlet. Note that the SfB CCE Corpnet Swtich must have internet connectivity for this to work. This may take some time so feel free to go for a lunch break after initiating the download:
3. Customizing the CloudConnector.ini file
The .ini file should be located in the ApplianceRoot directory and we can start customizing it using the sample .ini file created earlier. The full description and explanation of the parameters can be found in this article https://technet.microsoft.com/en-us/library/mt740649.aspx and we have used the defaults for many of these parameters and hence only the important ones will be highlighted here:
For the minimum hardware configuration supporting 50 concurrent calls:
[Common]
HardwareType=Minimum
Specify the local AD domain and SIP domain. The recommendation is to use .local for the AD domain
;Domain(s) of SIP URIs used by company users.
;Domain(s) registered on O365.
;Support multiple domains seperated by space. First domain is the default used.
;for phone URI.
SIPDomains=sgpolycomlab.com
;Domain DNS suffix for the Skype for Business Cloud Connector Edition itself.
;Virtual machines CMS, Mediation server join this domain.
;Can be local (e.g. does not need to be in public DNS)
;MUST be different with domain(s) registered on O365
VirtualMachineDomain=sgpolycomlab.local
Set the default gateway and DNS for Corpnet Switch to be able to download the necessary bits for building the VMs
;Default gateway in Corpnet
;Corpnet default gateway enables automatic updating the servers from the Corpnet
;It must be configured for Convert-CcIsoToVhdx to convert windows ISO file to VHDX file
;Corpnet default gateway will allow BaseVM to connect to internet and install window update packs
CorpnetDefaultGateway=<Default GW for Corpnet>
;DNS IP addresses for corpnet. Use space as separator if there are multiple addresses
;This setting is necessary for OS update when WSUS servers are not configured, or they are specified using domain names
;This DNS IP address will be added as a forwarder on the AD server
;During Convert-CcIsoToVhdx, this DNS IP address will be assigned to corpnet connection network adapter
CorpnetDNSIPAddress=10.222.210.51
Set the DNS server for the Edge external interface. This should ideally point to a DNS Server in the perimeter that can resolve internet addresses. If we do not set this, the default DNS will be the CCE AD DNS server. This may cause issues if the PSTN Gateway is also using the same FQDN as the SIP Domain and the CCE AD DNS server will make it authoritative for that zone
;Internet DNS IP address for resolving _sipfederationtls._tcp.<domain> and _sip._tls.<domain>
;This DNS IP address will be assigned to internet connection network adapter on Edge server
;The Edge server must be able to resolve public DNS records for the O365 Sip Domain
;If Gateway FQDN uses O365 Sip Domain in name for TLS purposes, be sure to set this IP Address to allow Edge to resolve these records
InternetDNSIPAddress=10.222.209.51
Set the name of the Edge Pool which must match the SN of the SSL certificate created earlier:
;Pool name which will be used to generate pool fqdn. It can NOT contain .<DomainName>
;FQDN of the Edge Pool external interface for SIP traffic must resolve to
;IP addresses on external interfaces of all edge servers (one
;A record per server) or to the VIP of HLB (if HLB is used for SIP traffic).
;The suffix of this FQDN should be the default (first) internal domain.
;The "sip" prefix is not allowed.
ExternalSIPPoolName=ap
The remaining parameters are for defining the PSTN Gateway and Voice Routes. In this lab we are using an Asterisk IP-PBX to emulate a gateway and using a LocalRoute to route calls to it. Since we are only using 1 gateway we remove the section for the 2nd gateway.
;Parameters for gateway
;If only one Gateway is needed, remove entire [GateWay2] section. Don't keep it but leave values empty.
;If Gateway FQDN uses O365 Sip Domain in name for TLS purposes, be sure to set InternetDNSIPAddress to allow Edge to resolve these records
[Gateway1]
; Gateway FQDN
FQDN=changipstngw.ucprimer.local
;Gateway IP address
IP=10.222.210.70
;Gateway Port
Port=5060
;Protocol for SIP traffic (TCP or TLS)
Protocol=TCP
;List of voice routes used by this gateway.
;Routes are defined in the next section.
VoiceRoutes=LocalRoute
;;;;;;;;;;;;;;;;;;;; Parameters for hybrid voice routing ;;;;;;;;;;;;;;;;;;;;
[HybridVoiceRoutes]
;Named voice route to be used by one or more gateways
LocalRoute=.*
Our PSTN Gateway Asterisk does not support REFER but we can send PAI
;;;;;;;;;;;;;;;;;;;; Parameters for TrunkConfiguration ;;;;;;;;;;;;;;;;;;;;
[TrunkConfiguration]
;Whether Gateways support Refer. It is used for Call Transfer scenario.
;The value can be "true" or "false". Default value is "true".
;EnableReferSupport set to "true" means the Gateway(s) support Refer which can handle all the call transfer stuffs.
;EnableReferSupport set to "false" means the Gateway(s) don't support Refer. Then Mediation Server will handle all the call transfer stuffs.
EnableReferSupport=false
;Whether forward PAI from Mediation Server to Gateways
;The value can be "true" or "false". Default value is "true".
ForwardPAI=true
4. Conclusion
The remaining customzatons of the CloudConnector.ini file is mainly to specify the IP addresses of the 4VM components of CCE as well as their host names which can be default. This concludes part 1 of this series and in the next blog, we will start building the actual VMs and configuring them for use with our Office365 tenant.


 RSS Feed